Tag Archives: cat eye

Review: Axiom Streamliner Disc DLX rear rack + Cat Eye Reflex Auto (TL-LD570R) safety light

When I got the TCX SLR 2, I stated it doesn’t need upgrades other than a set of fenders and a rear rack. Unfortunately, these two items are very hard to find locally. Whenever people talk about racks for bikes, 95% of the time they refer to contraptions to hang them on a  vehicle. Seldom do they think of an apparatus to help a rider carry his/her loads.

CAST YOUR BURDENS UPON THE BIKE

One reason why bike touring enthusiasts are able to pedal very long distances is because they let their bikes do their load lugging for them. Freeing the body from all burdens other than pedaling increases  long-term endurance and comfort. This also benefits handling, as the center of gravity is much lower with a rack and panniers compared to carrying your load on a backpack. To do this, they invest in bike frames that accept the installation of racks – usually at the rear, but sometimes even at the front as well. This is usually done via threaded holes, called “eyelets,” found somewhere on the rear triangle. For rugged touring bike framesets that can carry a front rack, the fork legs will also sport eyelets.

With the right frame as the basis, the next step is to look for suitable racks to hang your panniers from.

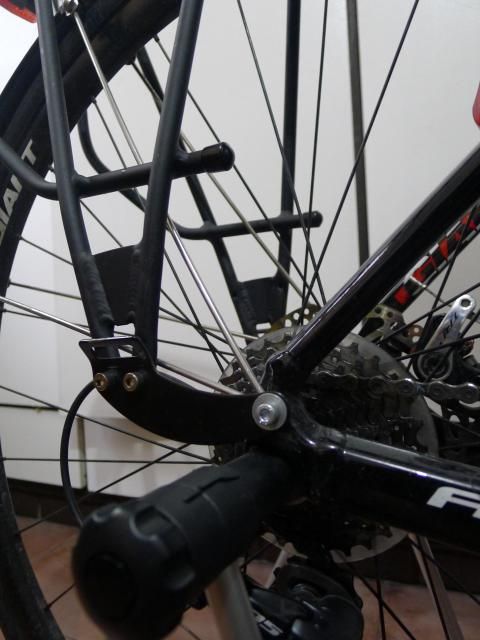
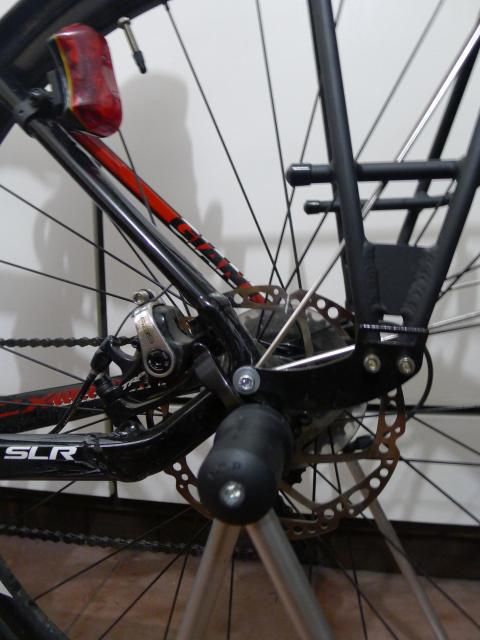
Bicycles with disc brakes pose a peculiar dilemma when installing a rear rack. Most rear racks have a lower mount meant to mate with  frame eyelets close to the dropout area. If the disc brake caliper is mounted on the seatstay, outside the rear triangle, mounting a rear rack becomes a more complicated affair as the rack’s lower mount has to clear the caliper somehow. To address this, rack makers have released products that are specifically meant to mount on frames that use disc brakes.

The TCX SLR 2 mounts its TRP Spyre disc brake calipers on the chainstay, inside the rear triangle. To the right is the “hidden” eyelet.

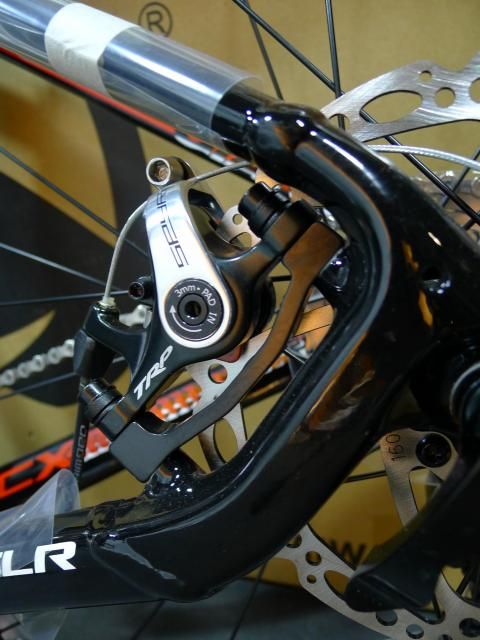
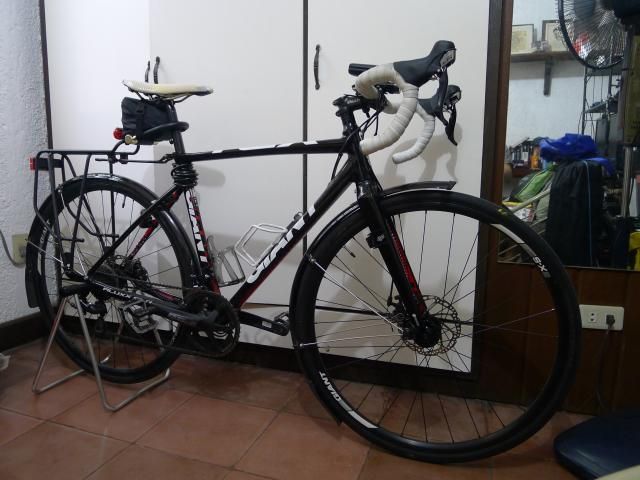
Many newer disc-brake road bikes mount their brake calipers inside the rear triangle, on the chainstay. This improves compatibility with rear racks and reduces the fuss of installation. The TCX SLR 2 is one of these bikes; in fact, this was one of my main criteria in selecting it.

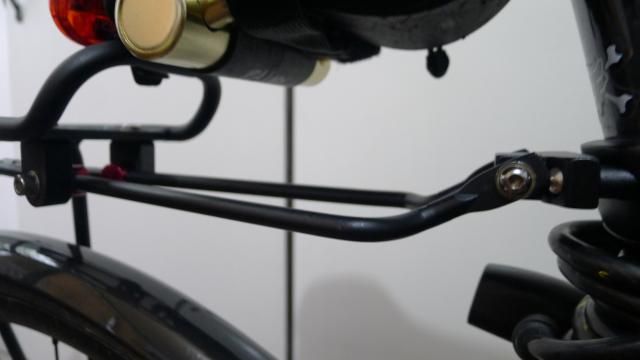
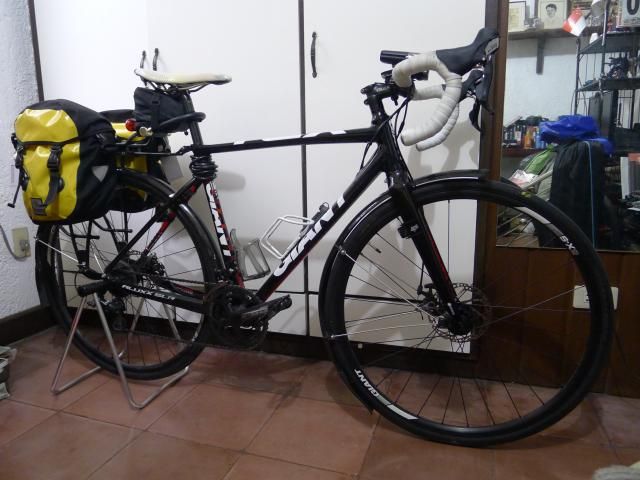
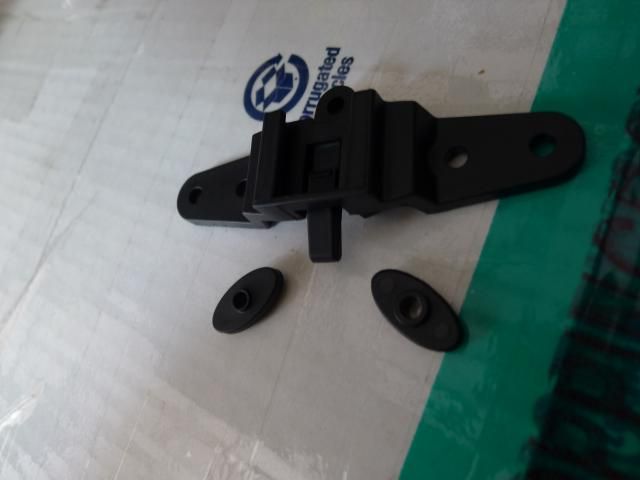
After reading a few reviews, I decided on the Axiom Streamliner Disc DLX rear rack. This is a 700g aluminum unit painted in matte black, rated for a maximum load of 50 kg (~110 lb). Unique to the Streamliner series are curved lower mount feet, which set the legs backward to increase heel clearance from pedal to pannier while pedaling. Incidentally, this feature also helps clearance from a seatstay-mounted disc brake caliper. The upper mount arms are also length-adjustable. Lastly, Axiom makes a big deal of how the Streamliner racks are more aerodynamic, with sides that taper toward the top, in an effort to bring the mounted panniers closer to the center line of the bike and reduce the frontal area. However, this tapering isn’t so noticeable on the Disc version.

INSTALLATION

Unlike the fiddly installation of the fenders, installing the rack was mostly hassle-free and straightforward. By comparison, the TCX SLR 2 is much better equipped to accept a rear rack. Both can share the same pair of eyelets down by the rear dropouts. All you will need are slightly longer bolts to ensure at least three turns’ worth of screw thread is left exposed through the eyelets, and washers to ensure the exposed bolt ends do not interfere with the chain in the smallest cog.

Seatpost removed from the TCX SLR 2. The round plate is the seatpost clamp plate and below it are the two original-length bolts. For mounting a rack, set aside these bolts and use the longer ones below the block adapter and cylindrical washers.
A close-up of the block adapter, seatpost clamping plate, and the two sets of bolts. Regardless of rack, the max torque for these is 6Nm to avoid damaging the seatpost.

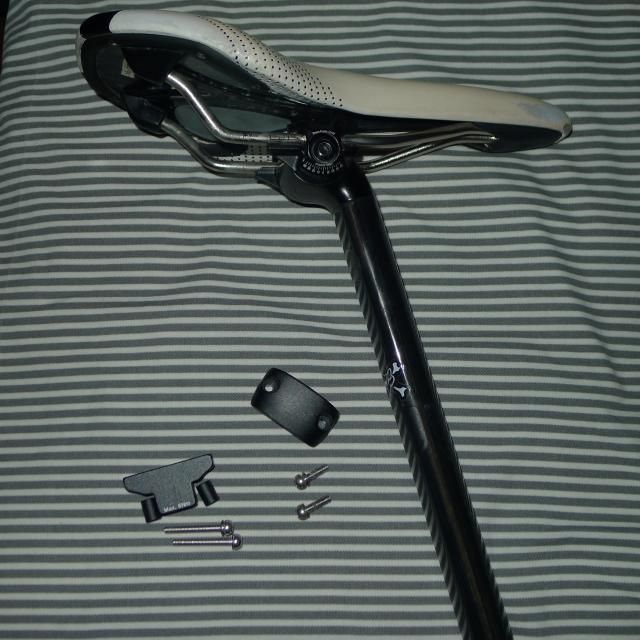
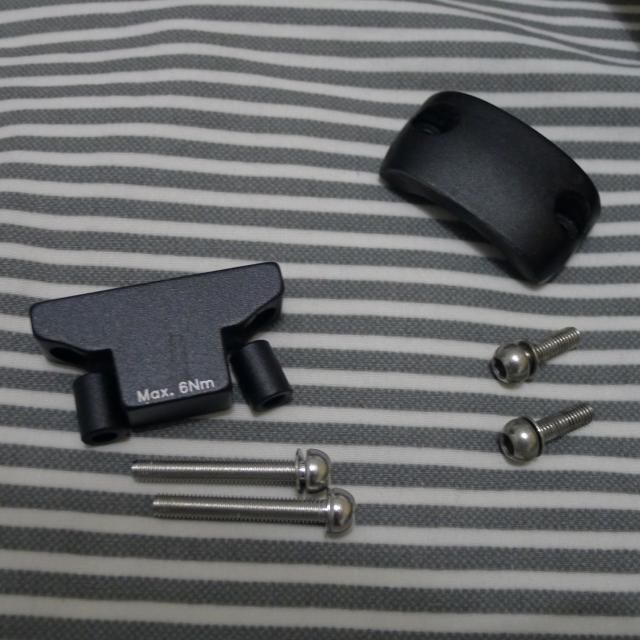
To mount the rack’s upper arms, Giant bundles a block adapter, cylindrical washers, and longer hex bolts for the seatpost clamp plate within the TCX SLR 2’s build kit. You remove the normal hex bolts on the seatpost clamp plate, then thread the longer bolts though the block adapter, cylindrical washers and seatpost clamp plate as you torque them into the bike’s top tube. The block adapter will provide the mount points for the rack’s upper arms. This is a neat solution, and you could easily run the bike with its rack removed, but the adapter block left attached.

Rack mount adapter installed. Note the eyelets on the sides. Those are where the upper mounts of the rack will bolt into.
Upper arms mounted to the bike. They telescope by loosening the side bolts on the left.
Drive-side eyelet shared by the rack and rear fender.
Non-drive-side eyelet shared by the rack and rear fender. No problems with the disc brake caliper mounting here.
Rear rack install complete
My Vincita B050WP-A panniers mounted midway on the length of the rack. So far I have had no heel strike issues while riding with panniers.
At last: My TCX SLR 2 in full commute trim!

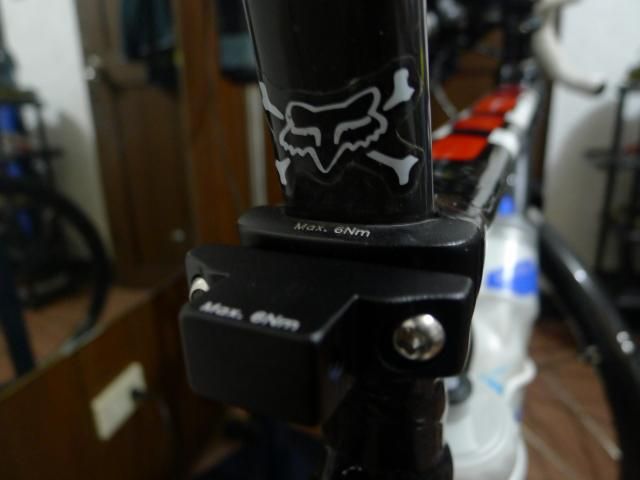
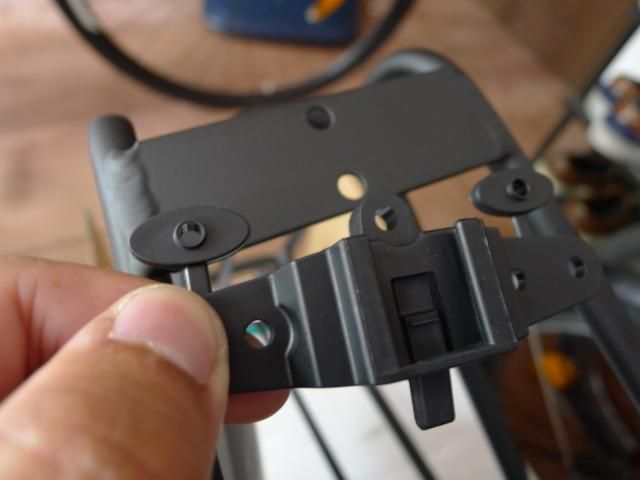
Axiom’s build kit is comprehensive, coming with all the bolts and hardware you’ll need. I do question, though, the use of fragile 3mm hex bolts on the upper mounts, and needing 4mm and 5mm wrenches to adjust the telescoping length. I feel they would have been better off with using 4mm for everything, but it is what it is, I guess. The mounting is as simple as can be; I went into the install blind and the process went very smoothly. In operation, the Streamliner does its job without fuss, although daily use of the rack and any panniers you mount does scuff and scrape the matte black paint away, exposing the shiny aluminum underneath. That’s to be expected, as the pannier hooks will leave their mark. All things considered, the Canadian outfit deserves a medal.

BUT WAIT, THERE’S MORE

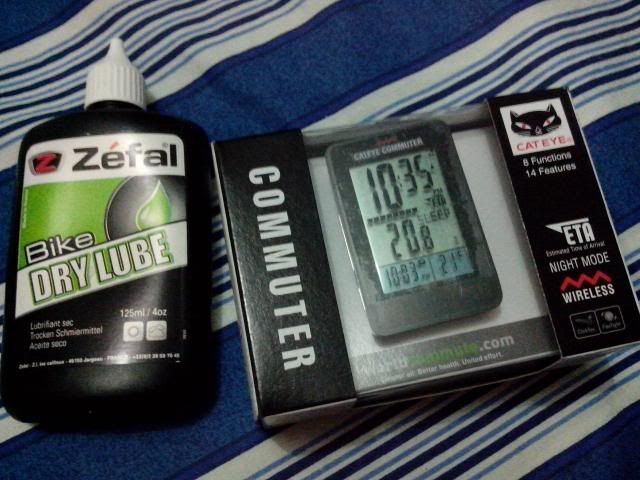
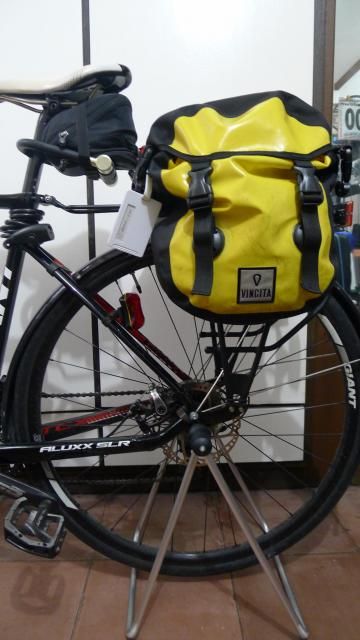
Like most other racks, the Streamliner unit has a mount plate for a rear safety light. I decided to mount a Cat Eye Reflex Auto TL-LD570R unit back there, which is both a standalone reflector and an automatically activated rear safety light. When the switch is set to its “active” mode, it turns on automatically by input from a light sensor and a motion sensor, and will turn itself off after thirty seconds of inactivity. This is a great idea, as with a simple modification, you could ride knowing that you always have a rear light working to keep you seen by other road users.

The Axiom rack’s mount plate for a safety light. In the foreground is Cat Eye’s rack mount bracket. Not seen here is a theft-deterrent measure: the bracket has a screw and washer designed to lock the Reflex Auto into place.
Cut off the two plastic loops as these will be used for the mounting of the bracket to the rack with supplied screws.
The Reflex Auto light mounted to the rack.

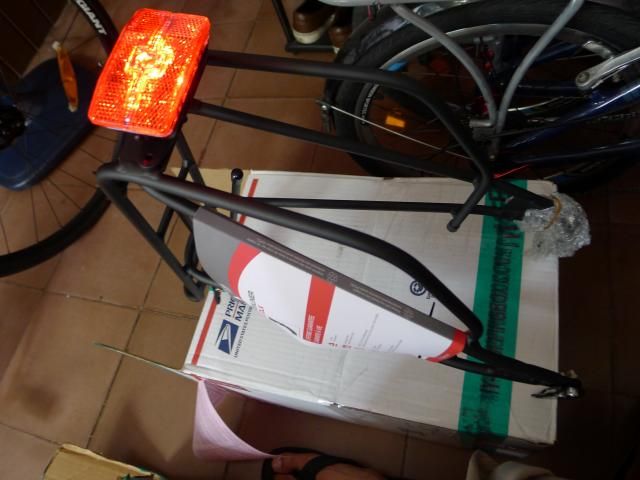
The only modification I needed is to disable the light sensor, by covering it with some electrical tape while the light body is open. This “blinds” the light sensor, and effectively turns the safety light on with only a shake or movement of the bike.

As a safety light, the Reflex Auto isn’t too shabby either. It offers five different modes:

  • random strobe 1
  • random strobe 2
  • pulse glow
  • regular flash strobe
  • steady glow
The rear of the rack with the Reflex Auto tail light mounted. Axiom’s advertised upwards “taper” of the Streamliner racks isn’t very obvious on the Disc version – which is no big deal.

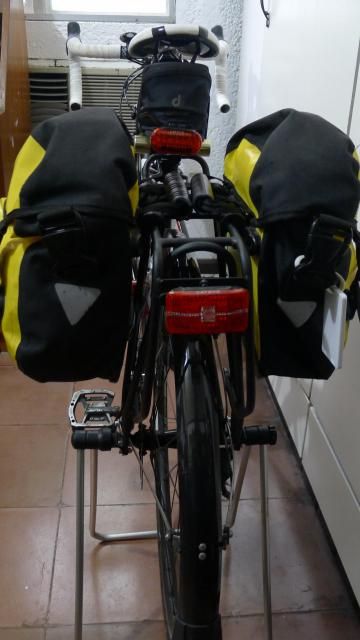
Of all the modes I make use of the pulse and steady glow ones the most. I have two other safety lights so I relegate those for flashing purposes. This functionality is helped by the sheer size of the light unit; you effectively have a palm-sized red rectangle on your bike when it’s on, visibility is good even on the sides, and it doesn’t have to resort to obnoxiously bright LEDs to get you noticed by other road users. A sexy tail light it ain’t, but it’s one of the better-thought -out ones.

With this, my Giant TCX SLR 2 “all-weather commuter bike” project is mostly complete. I can think of only a few things left to change out or “upgrade” on the bike, and those are for comfort or maintenance/maintainability purposes.

10917889_10201972632957969_5796182401660365678_n

Review: Cat Eye Volt 1200 (HL-EL1000RC) front light

As a bicycle commuter, I’ve already discussed the importance of being seen on the road, and one of the most effective ways of doing so is by using good bike lights.

Front lights, in particular, occupy a broad spectrum of options. There are low-powered models that are meant to increase a cyclist’s visibility to other road users, but don’t do so well for illuminating the road. Other models rated for higher light output can cut through the darkness and light up your way as you pedal, highlighting potholes and road acne in advance so you can take avoiding action.

The light I’m reviewing today undeniably belongs to the latter category. We take a look at Cat Eye’s Volt 1200.

FEATURES

  • High-intensity white LED x2 in OptiCube beam-shaping housing
  • Maximum output: 1200 lumens
  • Five operating modes
    • Dynamic – 2 hours at 1200 lumens
    • Normal – 5 hours at 600 lumens
    • All-Night – 17.5 hours at 200 lumens
    • HyperConstant – 14.5 hours at 200 lumens + 600 lumen strobe
    • Flashing – 100 hours
  • FlexTight handlebar bracket mounting
  • Aluminum body
  • Water-resistant
  • Replaceable 3.6V 6200mAh cartridge battery
  • Recharge time
    • 14 hours via USB 2.0 @ 500mA
    • 8 hours via high-current USB @ 2000mA
Retail packaging.

OUT OF THE BOX

Box contents: The Volt 1200, FlexTight bracket and microUSB cable.

The Volt 1200 comes in a nice cardboard box. Inside are the light itself, the micro-USB charging cable, instruction leaflet, and the FlexTight handlebar mount bracket. This is the exact same mount used by my other front light, the much smaller and lighter Cat Eye Nano Shot (HL-EL620RC).

The Volt 1200 disassembled by a hex key. The SD card is there for size comparison.

As an all-in-one torch-type unit, the black cartridge battery is pre-installed into the lamp body, mounting via three bolts. You can undo the bolts with a hex key and mount a spare battery if you had one, but obviously this isn’t a quick affair. Besides, the huge battery is enough for most rides, especially when kept out of the higher-output modes. At 6200mAh, it dwarfs most cellphone batteries in pure capacity. My own Lenovo P770 smartphone has quite a large battery at 3500mAh; the Volt 1200 practically doubles that.

The aluminum body of the Volt 1200 acts like a heatsink, with a row of ridges on its top. Running at 600 or 1200 lumens means this can become quite hot, which is normal. The light has a little sticker on its underside warning of this, next to the rubber gasket flap for the micro-USB charging port.

PERFORMANCE IMPRESSIONS

The first time I turned it on, I laughed maniacally. An honest-to-goodness 1200 lumens! This is a seriously strong light in Dynamic mode, and it can temporarily blind people when aimed the wrong way. The beam is so potent that it handily outshines most indoor lighting. Headlight aim becomes critical when using the Volt 1200. I find it’s better angled slightly downward, 15-25 degrees from horizontal. The sheer volume of light means you will definitely be seen – it’s best employed by illuminating your path, and by brute force it will light up quite a way into the distance.

1200 lumens from the Volt 1200 vs. 200 from the Nano Shot. The bigger light throws the light farther.

In terms of beam shape, the OptiCube reflectors and optics tightly control it to give you a focused rectangle of light with minimal spill, instead of a floodlight effect. Some people may want more peripheral light, but I find that the tight beam works well when you’re pedaling at higher speeds.

You’d think the 214g Volt 1200 would overwhelm its tiny FlexTight bracket, but this isn’t the case. Tightened properly, I never had a problem with the light drooping on the bar at all, even through bad roads.

OPERATION

Most people will see this light and think “I don’t have use for a 1200 lumen front light!” Well, true, in most cases it is overkill. However, the real draw of the Volt 1200 is how versatile it is. If the max output was the only good thing about this light, this review would have ended already.

The five modes are all good compromises between light output and battery life. You cycle between the main modes in decreasing order of brightness using a single press of the top button (Dynamic -> Normal -> All-Night -> HyperConstant, then repeat). Pedaling along East Service Road at 10 pm, at 18 km/h average speed, I used the 600-lumen Normal mode most of the time to light up the path, while being seen by the cars and trucks that ply the route. I reserve the full 1200 lumens for short bursts in very dark spots. In the daytime, I run the HyperConstant mode, which is a constant 200-lumen beam with a 600-lumen flash strobe, and this helps with visibility.

Below are sample beam shots taken with my camera. The light is mounted such that it is around 20 degrees down from horizontal. Settings are constant across all photos: ISO 400, an f/2.8 aperture, 1/2 second shutter, and 50mm-equivalent focal length. For distance reference, the white vehicle in the distance is 100 meters away.

Volt 1200 off.
Volt 1200 in the 200-lumen All-Night mode. The steady beam of HyperConstant mode is the exact same brightness.
Volt 1200 in the 600-lumen Normal mode.
Volt 1200 in its maximum Dynamic mode. Even with the light angled around 20 degrees down from horizontal, it’s still illuminating around 60 meters of the road ahead.

Perhaps the only mode I don’t use at all is the Flashing mode. This turns the light into a high-powered blinker with an annoying pulse frequency. I prefer HyperConstant for this purpose, as the pulses aren’t so quick, and the constant beam gives oncoming traffic a better way of estimating distance between you and them.

Unfortunately, accessing the Flashing mode inadvertently (a double-press of the button, accessible at any time) is done way too easily. In practice, you may find that while trying to turn down the brightness, pressing too quickly triggers the borderline obnoxious Flashing mode.

The gasket and contacts on the massive 6200mAh battery.

Once the Volt 1200’s button glows red, it’s time for a recharge. Left alone long enough, it will automatically step down in output to squeeze as much run time out of the battery. At 6200mAh of capacity, charging this beast will take a while, and I would suggest investing in a high-current USB charger. The Volt 1200 has a useful way of discerning between normal and high-current charging. Normal charging leaves the button glowing red, while high-current charging is shown by a slow-cadence flashing.

VOLT 1200: YEA OR NAY?

I’ll get to the elephant in the room: this light isn’t affordable. Cheapskates are going to shy away from this light from the price alone, no matter what merits it has.

That said, 1200 lumens hasn’t been priced like this before – not from an established lighting brand. Not too long ago, you had to pay an arm and a leg for a light of equivalent output – and not in an all-in-one unit, to boot. Year on year, the improvements in bicycle lighting technology have become so great that my 200-lumen Nano Shot has been overtaken by the Volt 300 three years later, which packs 300 lumens in a package that’s half the price. If you look at the Volt 1200 as an investment, in that you’re buying a torch-type light that is ahead of the technological curve for about five years, coupled with the potential of buying replacement batteries…the price tag doesn’t seem too bad.

The remnants of what appear to be aluminum oxide between the cooling ridges. I’ve scratched most of it off with my fingernail.

Also worth noting is that the bare aluminum on my own unit has shown a few signs of cosmetic minor corrosion. This is most evident in the clingy greenish hard powder in between the cooling ridges (which I assume is aluminum oxide) and some blistering on the underside. No adverse effect on the light’s function, though, and it might simply be due to my sweat falling on the lamp’s metal body. The Volt 1200 is still as solid as the day it was unboxed.

The blistering on the underside. It’s usually found where the stickers are. It doesn’t look great, but it’s all cosmetic and doesn’t affect the functionality at all.

You may question the value of a 1200-lumen headlight, but the great thing about the Volt 1200 is that it is so much more than that. The capacious battery, great beam control, and a thoughtful selection of modes mean that this multi-role light excels at endurance – it can be the light you need it to be. Mount it to a mountain bike, turn on Dynamic mode, and see the trail light up right in front of your eyes. In practice, while riding with the light in HyperConstant mode in the daytime and Normal mode at night, over a total of two hours’ commuting per day, the battery will last a week with juice to spare. Charge it overnight using a good high-current USB charger, and you’re good to go the next day for another week’s worth of riding.

VERDICT

Reliable, powerful and well thought-out – one of the better lights around. An investment worth saving up for.

Review: Cat Eye Commuter (CC-COM10W) wireless cyclocomputer

At its core,  a cycle computer, alternatively called a “cyclocomputer” or “cyclocomp,” is a measurement tool for distance and speed. Ever considered, though, what else it could do if you rode your bike as a means of transport?

Osaka-based Cat Eye asked the same question and came up with the CC-COM10W…or the “Commuter” if the model name is a mouthful.

FEATURES

  • Date and time
  • Elapsed ride time
  • Instant temperature measurement
  • Speed measurements: instant, average, and maximum
  • Distance measurements: Current, day, week, month, year, and total (odometer)
  • “CO2 offset” measurements: Day, week, month, year, and total
  • Electro-luminescent backlight on LCD, either instant or “Night Mode”
  • Estimated Time of Arrival (ETA) function

HARDWARE

As this is a wireless cyclocomputer, it is dependent on two bits for data: a speed sensor mounted to one of the fork blades by two zip ties, and a small magnet you pinch to one of your front wheel’s spokes by screwing it into a plastic bracket. As the front wheel spins, the magnet passes through the sensor’s range, and its speed data is sent to the computer unit. Both the speed sensor and computer unit require their own CR2032 batteries.

The spoke-mounted magnet and the speed sensor, mounted on a rubber fitting and secured with two zip ties.

The Commuter mounts on your handlebars or stem via Cat Eye’s now-ubiquitous FlexTight system, which makes use of a worm-geared strap and a thumb wheel to tighten. Once the strap is on, the Commuter mounts by sliding into the bracket, where it stays solidly locked in place. Physically separating it from the bracket is actually a daunting prospect at first, because Cat Eye say you have to pull the Commuter away from you while lifting up the edge nearest you. With practice this becomes easier.

ClickTec interface means the display becomes one huge button when pressed from the bottom edge.

Cat Eye says the plastic-bodied Commuter makes use of the “ClickTec” interface, which does away with all buttons on the front face. Instead, all three buttons are on the back of the unit, and while riding, you push down on the trailing edge of the Commuter’s face. This engages the primary “Mode” button on the back, for switching between modes per press, or resetting of current ride data to zero when held down for five seconds. This makes for a streamlined appearance and simplified operation, but introduces its own caveats – which I will discuss later.

SETUP

You enter setup mode by pressing the partially sunken Menu button on the back. The Commuter has to be off its bracket for this. Initial setup is done by date and time input, unit selection (metric or English), and most importantly the setting of your wheel’s circumference. On the 20″ x 1.5″ Schwalbe Marathon Racer tires I roll, this is 1490 mm. The manual contains a convenient table of circumference values if you don’t want to measure this via rollout method.

USE WHILE RIDING

Display mode: Instant speed + ride distance. Note the segmented ETA bar in the middle of the two main tiers of numerals. The blue bottom bar houses the clock and temperature.

The Commuter has a large two-tiered face with easy-to-see block numerals. Time and temperature readings are permanently displayed with smaller digits in a blue bar at the bottom. Another black bar, broken into ten segments, divides the two tiers – this is the ETA’s permanent display function.

Display mode: Instant speed + maximum speed, with backlight in action. Shot with my cellphone with no flash, so photo’s not very good. Incidentally, this is the fastest flat sprint speed I managed on my Vitesse.

The third button on the Commuter controls the backlight, and it’s mounted on the top right corner of the unit’s back side. Pushing it gives around four seconds of usable light. While the backlight is active, you can again press and hold the backlight button to activate Night Mode. Here, the first press on the face of the Commuter turns the backlight on, before cycling through the modes.

Display mode: Instant speed + ride distance.

Speaking of which, below are the Commuter’s display modes while riding, with the top tier information mentioned first:

  • ETA display + Instant speed
  • Instant speed + Elapsed ride time
  • Instant speed + Distance
  • Instant speed + Average speed
  • Instant speed + Maximum speed
Display mode: Instant speed + elapsed ride time. The Commuter doesn’t count time spent not moving.

ETA FUNCTION AND DISPLAY MODE MECHANICS

Most of the time, the larger top tier displays your current or instant speed reading, while the bottom tier cycles through distance, average and maximum speeds for the current ride session – pretty standard cyclocomputer stuff.

The main difference of the Commuter is the ETA function, which calculates your estimated time of arrival. This is based on your speed and a distance that you can either enter manually, or automatically taken from your most recent previous ride. The estimated time of arrival is then displayed on the top tier while you are riding in the ETA display mode, and updated in real time.

The ETA functionality’s manual distance setup mode. I usually set it to 13 kilometers. I find the automatic mode isn’t so great.

Earlier I mentioned the ten-segment black bar dividing top and bottom tiers. This is a permanent progress indicator for your ETA function distance. The closer you get to completing the ETA function distance, the more the bar fills up. When you do complete your distance, regardless of your current display mode, the Commuter will momentarily switch to ETA display mode and flash the digits around three times before reverting to the previous display mode.

This is a decidedly bicycle commuter-specific functionality and reflects Cat Eye’s focus with this cyclocomputer. However, there are a few flaws in the implementation.

The “Automatic” ETA setting  assumes that your last ride’s distance will be repeated for the current ride. In reality, I don’t do this, and I would assume most don’t, as well. It makes for an idiot-proof kind of setup, but it’s also not a very smart implementation, either.

I find myself using the “Manual” ETA setting more often. This is hugely useful for distance training; it’s a good way of ensuring that you hit at least a target distance per ride. Unfortunately, for commute duty, it isn’t granular enough to be truly useful, because you have to set distance in whole units – either whole miles or whole kilometers. Cat Eye don’t give you the ability to further break distance down into fractions or decimal values. If you’re bike touring, this is fine; if you’re bike-commuting in the city, this is a strange limitation.

CO2 OFFSET CALCULATION FUNCTION

With the focus on environment friendliness, there will be people turning to bicycle commuting as a carbon-neutral form of transportation. The Commuter has a function for measuring exactly that.

Here the Commuter tells me that based on my ride distance for February 2014, I have saved 51 kg of CO2 output.

Cat Eye have used a simple output value of roughly 140 g/km of CO2 for this, based on the 2008 vehicular average in Japan, and included it mainly for comparison purposes. Incidentally, this is just about the CO2 emission value that my own car, a 2005 Honda Jazz, was rated for in the UK. This isn’t an authoritative value however, as many cars since have been rated for much lower – a lot of cars have broken the magic 100 g/km CO2 barrier since 2012, especially in European countries where cars are taxed by emissions.

Basically the Commuter takes the 140 g/km CO2 emission figure hard-wired in its brains, and multiplies your distance to get a carbon offset value in kilograms. In the Philippine context, I think this is a nice-to-have feature, but is by no means essential. Treehuggers and hardcore environmentalists may brag about this value, though.

WEAKNESSES AND CAVEATS

The ClickTec interface is my main complaint about the Commuter. It works very well, and the five-second delay makes deleting a ride’s details a deliberate act. I think Cat Eye deliberately chose the five display modes to avoid information overload for the rider, which is great. However it also restricts the Commuter’s on-the-go functionality a little too much.

The “odometer” or total distance summary view.

Readers who’ve used other cyclocomputers will notice that there is no easy way to access the total distance summary (or “odometer” reading) while on the go. This is a shame because the Commuter is versatile enough to report your distance for the past day, week, month or even year, too. To access the distance summaries, you have to physically take the Commuter out of its bracket and press the Menu button – there is no way of doing so while on the bike. Riders who use distance to determine replacement of parts like tires, brake pads and chains will find this annoying.

Distance summary for the year 2014, so far.

Distance summaries are not the only functionality hidden away in this manner. Even the CO2 offset calculation function, sharing the same day/week/month/year/total summary categories as distance, is also tucked away like this, which isn’t so bad. More baffling though is that the setup of the ETA function also requires physical removal of the Commuter – because it’s hidden in the Menu button as well! Cat Eye decided to take the ETA function – basically the unique selling proposition of the Commuter – and hid it so that manual changes to the ETA distance are more involved than they have to be.

Finally, all operations that require removal of the Commuter are done via combinations of pressing and holding the Menu and Mode buttons with your fingers. They’re not exactly the most comfortable buttons to push, as they are small, round, hard plastic things about as fun to push as a pimple. Yet Cat Eye require you to do data input with them, which means having to press the Mode button multiple times.

COMMUTER: YEA OR NAY?

So, overall, how is the Cat Eye Commuter cyclocomp as a product?

First, the negatives.

ClickTec is a great idea, reducing mental workload mid-ride, but it makes the Commuter too simplified for its own good, while introducing needless complication into other functions. I think it could do with at least two more buttons, maybe on the top left corner – opposite the nicely located backlight button.

On week 9 of 2014, I saved 5.45 kg of CO2.

Some people may balk at the thought of zip ties holding the speed sensor in place on the fork blade. A screwed-on bracket would no doubt be more secure, but so far I haven’t had issues with either speed sensor or magnet falling off my bike.

The carbon-offset functionality is neat, but ultimately it’s a gimmick. I think most riders may not find much use out of it. The implementation is done well enough here, though.

The ETA functionality, however, is a great idea – and here we kick off the positives. For Strava riders that regularly join the monthly mileage challenges, it’s a good way of tracking your distance progress in the background. Cat Eye need to finesse the execution further, particularly the allowance of partial-kilometer or partial-mile distance setting, and easing the manual distance setting itself, but this is a good start. We might see these features in a future update of the present Commuter – perhaps a CC-COM20W model.

Note the little “light” graphic on the top-right of the display. This signifies Night Mode is active. This means the first press on the face of the Commuter turns the backlight on. You will need to press again to change the current display mode.

The plastic-bodied Commuter is well-built – it stays securely attached, looks good and is reasonably weatherproof. The display can be a little picky with viewing angle, but it’s large enough to be seen even when installed level on a flat-handlebar bike, and the backlight works a treat.

Lastly, it’s a reasonably inexpensive addition to your bike, and it’s one of Cat Eye’s cheapest available wireless cyclocomps. Shop around and you can get one for as low as PhP1,400. It’s not the last word in functionality, but a few niggles aside, it does the basics very well.

VERDICT

Recommended. Not perfect, but reliable, fairly priced, and simple to use.