It has been a great honor writing for the United Folding Bikers blog website for the past two years. I would like to thank Byron Villegas for inviting me to this opportunity to share my growing love for cycling. Also, my thanks go out to all the readers that have followed this blog through. You’ve been a great audience, and I hope I have helped you in your cycling journeys even in some small way.
The last thing I want to do is to monopolize the writing duties for this website. That said, I would like to hand over the reins to other members, and let them share their own cycling experiences.
For my part, I will continue my cycling stories – this time, on my own blog. If you feel like following my back wheel as I share more stories from the saddle, do head on over to The Accidental Randonneur.
In many Anglo-Saxon countries like the UK and Australia, the media seem obsessed with pitting drivers and cyclists against each other.
Australian TV reporter Charlie Pickering, host of ABC’s “The Weekly” and an avid cyclist himself, sought to fix some of these wrongs – in a hilarious little feature that also now airs on YouTube as a standalone video. It’s definitely worth a watch.
As much as we are solving many problems as cyclists, we have to be responsible road users too, and follow the rules of the road. I believe it is our burden to set that example in order to sow the seeds of a better cycling culture. Ultimately we all have to share the roads – whether we be cyclists or drivers.
If you like working on your bike, by now you should be used to turning and tightening bolts with a hex key or Allen wrench. Have you ever wondered that perhaps you’ve turned a bolt too tightly though?
WHAT IS TORQUE?
Most bolts on a bicycle actually have a torque specification. If you don’t remember your basic physics, torque is a measure of rotational force applied to an object along an arm of a given length. Torque is usually expressed in newton-meters (Nm) in the metric system, or pounds-feet (lb-ft) in Imperial measurement. In mechanics’ case, this arm is usually a wrench of some sort.
TORQUE SPECIFICATIONS
Normally you can turn a bolt in by hand until its head becomes flush with (and snugs up against) the surface you’re screwing it into. Once finger-tight, further tightening happens with a wrench, where you apply more and more torque to the bolt. As this happens, the tension also builds up along the length of the bolt you’re tightening, due to the interaction of the threads of the bolt and the receiving object. Exceeding the torque specification for that bolt can mean breaking it clean in half, as the material gives out under the tension. These broken bolts are quite hard to extract.
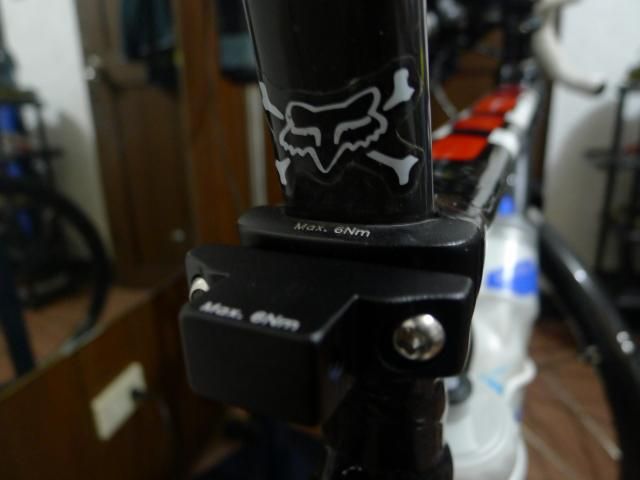
The seatpost clamp plate and rack adapter on my TCX SLR 2. Both these parts are holding up the bike’s carbon fiber seatpost, so the maximum torque value is clearly engraved on both.
For the most part, metal parts are quite tolerant of a little excess torque. Torque specifications become really important, however, when you’re dealing with carbon fiber parts. Carbon fiber is a wonderful material, but one thing it’s not strong against is crushing force. If, for example, you have a carbon fiber seatpost and exceed the torque spec on its seatpost clamp, you will almost certainly damage the seatpost. Proper torque is also very important for the parts of a folding bike’s hinge and latch mechanisms, even though they’re made of metal.
TORQUE WRENCH TYPES
The dangers of applying excess torque are why a torque wrench is a worthwhile investment for serious mechanics. There are two general types.
A beam-type torque wrench being used to check a micrometer-type torque wrench. Photo courtesy of Park Tools.
A beam-type torque wrench is a socket wrench with a graduated scale, which you use to read the deflection of a freestanding secondary beam. That beam’s deflection off the main wrench arm is the applied torque. Beam-type torque wrenches are simpler and cheaper, and don’t need any maintenance, but require you to keep an eye on the scale. They’re best used for high-torque applications, such as crank arms and lock rings for cassettes or Centerlock brake rotors. These parts see torque loads in the 35-55 Nm range.
A micrometer-type torque wrench is different. Like its namesake, the end of the arm has a rotating collar used for measurement. On a micrometer caliper, this widens or narrows the caliper arms; on a micrometer-type torque wrench, it dials in the desired torque value. Once this value is reached, a clutch mechanism will release and give you both the characteristic “click” sound and slight deflection of the arm. Micrometer-type torque wrenches are more suited for the low-torque applications of most other bolts on a bicycle, but they do need periodic recalibration – and proper storage to reduce the need for recalibration.
Ritchey’s Multi-TorqKey is an example of a torque key. The two wrenches are preset to 4 and 5 Nm. Photo courtesy of BikeRadar.com
A sub-type of micrometer-type torque wrenches is the torque key. These are simpler devices which retain the clicking clutch mechanism, but ditch the adjustability. They are, in essence, made to stop at just one preset torque value, usually the most common 4 or 5 Nm – although Park Tool’s newly relased ATD-1 adjustable torque driver has five fixed torque values you can select.
Bike Hand’s torque wrench comes in a blow-molded black plastic box, made to house the wrench itself and all its bits. A metal double-hinge clasp keeps it shut.
The selection of bits should guarantee that it will work with almost any bolt on your bike. On my Vitesse, 95% of its bolts can be worked on with a 5mm hex key. The larger size hex key bits are for use on kickstand mounting bolts (8mm) and freehub bodies (10mm). The 5mm long hex key bit is particularly useful for tightening the clamp band bolts on my TCX SLR 2‘s STI levers, which are slightly obscured by their brake hoods.
I like that all the bits themselves have a knurled collar around them. This enables you to turn loose bolts in by hand until finger-tight, before bringing in the torque wrench to tighten to correct torque. You press in the button on the head of the torque wrench to fit the bits onto the 1/4″ square drive socket, where they will stay on very securely.
The torque wrench’s scale for set torque, going all the way to 24 Nm. Here it’s set to just under 2 Nm for proper storage and to maintain its factory calibration.
Turning the collar sets the torque, displayed by a moving red column along a vertical graduated scale. This lets you use Bike Hand’s torque wrench on low torque applications such as stem and seatpost bolts, as well as higher torque uses, such as the 15-18 Nm needed to tighten the TCX SLR 2’s saddle clamp.
I find that for torque loads of less than 4 Nm, extra vigilance is needed as the clutch mechanism clicks very softly and the deflection isn’t very noticeable. At 5 Nm and up, the clutch mechanism works much better and more noticeably.
For more instruction on how to properly use a torque wrench, the boys of GCN have a video on it below.
VERDICT
I’ve had this torque wrench for quite a while now, and it’s a reliable tool to have, especially while working on the TCX SLR 2’s seatpost and stem bolts where setting correct bolt torque is critical. At PhP1,800 to PhP2,000, it’s not exactly cheap, but it’s one important tool to have in your arsenal if you’re serious about wrenching on your own bikes.
Most bicycles have a conical cluster of gears hanging off the hub of the rear wheel. Despite external appearances, though, they’re not all the same.
In fact, it is this rear gear cluster that makes up the heart of a bicycle’s derailleur-based drivetrain. The cluster of cogs is called either a “freewheel” or a “cassette.” How do you tell which is which? The major difference is in how it attaches to the rear hub.
New York-based DIY mechanic RJ the Bike Guy shows the major differences in the excellent video below.
To recap:
A freewheel is a self-contained unit of the cogs and ratchet mechanism that screws onto a threaded rear hub.
Freewheels make up the heart of the drivetrain of older and/or more affordable bikes that have 5, 6 or 7 cogs, or even single-speed bikes.
A cassette is a simple collection of cogs that slides into a splined rear hub, retained by a lock ring. The ratchet mechanism is inside the rear hub itself, in a part called the freehub body.
Bicycles with derailleur drivetrains with 7 to 11 cogs on the rear wheel make use of cassettes and freehub bodies.
“Pixel” fabric appears ordinary in daylight but becomes hyper-reflective when struck by artificial light, due to embedded glass micro-beads
Waterproof, with storm flap and taped seams to avoid water ingress
Internal mesh membrane
Cycling-specific cut with dropped tail for bum coverage
Elasticated cuffs
Large rear pocket with Velcro closure
Available in three colors – red, lime green, black
IMPRESSIONS
When I got this jacket, I was so intrigued by Sugoi’s reflectivity claims that I immediately put it to the test by taking photos of it with the flash off, then on.
Front view of the Zap jacket under normal light.Front view of the Zap jacket, taken with LED flash from my cellphone.Rear view of the Zap jacket, taken with LED flash from my cellphone.
Sure enough, the Pixel fabric is a legitimate technology that does what it says on the tin…or fabric, in this case. Under daylight or normal overhead indoor lighting, it appears like a regular jacket. Shine a focused beam of light on it, however, such as from a flash bulb or a headlight, and the whole jacket becomes dazzlingly reflective – not just one or two details. Some of the glass micro-beads can even rub off the jacket and land on your person, making you appear to have reflective spots!
Here you see the Zap jacket rolled up into a jersey pocket. Some of the glass micro-beads will slough off the jacket and onto other surfaces, as shown in this flash shot.
I’m still a firm believer in running your lights while riding in order to be visible. That said, the jacket raises your profile to a much larger extent than if you were to use safety lights alone, which are basically “point” light sources. Anything reflective still relies on other vehicle drivers actually bothering to drive with their headlights on, however.
Judging the Zap on reflectivity alone doesn’t do it justice. It’s still supposed to be a jacket after all, and one that’s supposed to be waterproof in the rain, to boot.
WATERPROOFING VS. BREATHABILITY
Now, one important thing to know before proceeding: “waterproof” as an adjective doesn’t mean no water will ingress at all. Waterproof by clothing standards means an article of fabric will stand up to a certain water pressure or volume level before it eventually wets and gets soaked through. This can be improved by taping a garment’s seams, which are the points where water can seep in first.
Conversely, cycling as an activity will inevitably result in the rider generating sweat from underneath the jacket, and the term “breathability” refers to how well an article of fabric can let this sweat out in the form of water vapor. Rain gear that isn’t breathable is akin to riding your bike while wearing a plastic bag or sheet: you may not be getting rain ingress, but you will get wet from your sweat anyway. Common features meant to improve breathability are strategically located perforations or vents that are either fixed or can be opened and closed at will.
As you can see, waterproofing and breathability are two opposing sides of the same coin, and so each rain jacket out there is a compromise between the two conflicting goals.
The insulating ability of the material also comes into play here, to an extent. As long as you are moving on the bike, less breathability can be a positive factor if it means you can comfortably maintain your body’s warmth and guard against the wind getting in. This temperature regulation is why a good cycling rain jacket will keep you from catching a cold when riding, even when you’re sweating.
BEYOND THE REFLECTIVITY
So, having said all that, how does the Zap do? Pretty well, I should say.
The Zap jacket I have is a size XL. A little long on the sleeves and just a bit baggy in fit.Note the dropped tail.With the reflectivity working you can see the dropped tail much better. No photo manipulation here, folks – this photo is straight from my cellphone.
The jacket under review is a size XL. For someone like me, 5’7″ with a bit of a gut, perhaps the smaller size L is a better fit if you want your cycling jackets close-cut, but the XL is still a decent fit. The Zap has the classic dropped tail hem, which provides coverage for your bum while you’re bent over a road bike and pedaling or sprinting away. That dropped tail also houses a large single rear pocket with a Velcro flap closure, wide enough to swallow three granola bars side by side – or your phone and wallet. The cuffs are elasticated, which can cinch up the fit around the wrists, but I wish they had a Velcro or drawstring closure instead for more adjustability.
That rear pocket is the width of three granola bars. Pretty large.Reflective granola bars anyone?
I’ve worn the Zap in quite a few rides where the rain was pouring at moderate strength for an extended amount of time. Worn with a cycling jersey, arm warmers, and a Uniqlo AIRism shirt as a base layer, it’s quite amazing how well and for how long it could keep the rainwater at bay. Given that level of rain, it would take 90-100 minutes of continuous riding before the arms and shoulders start getting damp from the rainwater – and you’d feel it, as it will be colder and clammier to the touch than the sweat you’re generating.
The Firefly Brigade’s March 2015 Critical Mass Ride, here passing SM City Sucat on a rainy morning. I’m the rider with the yellow helmet, and while riding at a slow pace, the Zap jacket kept me comfortably dry. Photo courtesy of the Firefly Brigade.
That said, on the scale of compromise between waterproofing and breathability, the Zap leans more toward the former. The Pixel fabric and interior fleece mesh lining excel at insulation and trapping your body heat to keep your core warm and comfortable. It also means the Zap really is a jacket for sustained rain and cold, gloomy conditions. There are no underarm perforations or added zippers to open for more breathability when needed; if you get too hot under the collar, your only option is to open the main zip. Given how warm it can get in the Philippines, this is a minor letdown for people expecting to wear the Zap year-round for better visibility at night. It’s fairly bulky rolled up in a jersey pocket, so not the most “packable” jacket out there, and the storm flap is a little strange and unwieldy in that it sits on the left side of the jacket, rather than parallel to the zipper on the right side as on most others.
VERDICT – YEA OR NAY?
Given how well it delivers on its promises, however, the Sugoi Zap jacket is a very good piece of cycling kit, one of those investment-grade items worth saving up for. It should last you years if taken care of properly, and it’s a useful addition to any cyclist’s wardrobe.
Perhaps subsequent versions of the Zap can incorporate more ways of tweaking the fit and better breathability, or it may even spawn a lightweight windbreaker version for more everyday use as a bike commute garment.
Six months after BGC Cycle Philippines 2014, I sign up for its summer counterpart. This is the first time I’m joining the Alaska Milk-sponsored version of one of the most popular mass participation ride events in Manila. How will it differ?
THE ROUTE
Because Bonifacio Global City no longer figures in the name of the summer event, the organizers have a little more leeway in the route design. They seem to have taken their cue from the SM Mall of Asia area, whose posterior bayside streets are now the stomping grounds of road cyclists that do loops upon loops of the streets in various pacelines every weekday morning.
The route reflects this. The start/finish straight is along Seaside Boulevard, where riders ply J.W. Diokno Boulevard and the southernmost tip of Gil Puyat Avenue. This three-kilometer leg is a launchpad for the meat and potatoes of the route: a 4.15km-long stretch of Roxas Boulevard to the Solaire Casino at Aseana Avenue, encompassing the Gil Puyat Avenue and EDSA Extension flyovers before doubling back on itself, over the same flyovers, back toward Vicente Sotto Street. (Ignore the Bradco Avenue U-turn on the map; that was scrapped.) This main 8.3km loop splits the difference between the 20km Community Ride and the 40km Challenge Ride; the only difference is the number of laps you make. Challenge riders do four laps; Community Riders do two. After their final lap, riders turn at Gil Puyat Avenue for the final approach back to the Seaside Boulevard finish line.
Apart from the flyovers, which provide elevation as well as bottlenecks, this course is flat, fast and wide-open. As far as road cycling goes, it’s basically a criterium race course. This compact layout allows the route organizers to minimize interference from the vehicular and rail traffic of the very busy Gil Puyat Avenue-Osmeña Highway intersection, which was an issue half a year ago.
CLAIMING THE RIDE PACK
The distribution of ride packs was done at Microtel Inn at the corner of Seaside Boulevard and Coral Way. Due to delays in the supply of the jerseys from long-time supplier F2P, Challenge Ride participants had to wait until 12:00pm on May 15th to claim their packs. I claimed mine on the morning of the next day, parking my bike at the secure bike parking area and walking into the second floor.
Bike parking at Microtel Inn.Photo courtesy of Alaska Cycle Philippines/Sunrise Events.
As with last November’s event, Sunrise Events have gotten the distribution process of the ride packs down pat. I was in and out within twenty-five minutes. I was fortunate enough to have had a jersey size still in stock, though; one common complaint I heard was that some of the other sizes were exhausted.
Photo courtesy of Alaska Cycle Philippines/Sunrise Events.
What I did find somewhat questionable were the contents of the ride packs.
Rudy Project’s contribution is a “transition bag” that’s really three drawstring knapsacks meant for storing your stuff for swimming, cycling and running. A few of my buddies joked that we may have unknowingly signed up for a triathlon. Useful, I guess, but odd all the same.
All the official ride pack contents, plus Alaska Milk product freebies. The musette or feed bag is the one at the top.
The second item is a musette or feed bag. This is patterned after the same items that soigneurs (support staff; pronounced “swan-YOORZ”) of professional cycling teams hand out to their riders when they pass through designated feed zones. It’s a decent cycling-related freebie, but it could stand to be a little larger. I’m not sure many Pinoys even know what a musette/feed bag really is – they might just see this as a fancy printed bag with questionable capacity and usefulness.
Finally, Regent Snack Foods gives you a bag of snack foods and chips arguably larger than the actual ride pack itself; that seemed really out of place for me. I had trouble packing the thing into my panniers because of the sheer air volume inside the snack packs. Besides, with Alaska Milk pushing exercise on people with events like these, exactly how well does Regent’s snack food fit into the whole picture?
THE EVENT JERSEY
Delays in delivery and supply issues aside, this has got to be the best-looking Cycle Philippines event jersey yet.
Front view of the event jersey.Rear view of the event jersey.
The print is striking yet flattering. By keeping the belly area free of large expanses of white, those with prominent guts need not be as ashamed of wearing this jersey as they would have been with the 2014 BGC Cycle Philippines one. I returned to my original XL size and appreciated the clingier, more form-fitting cut of the material. Finally, the pockets are of a decent depth. They’re at that Goldilocks compromise between too shallow for security and too deep for hand ingress.
I still miss the silicone gripper tape on the rear bottom hem, and the extra zipped pouch on one of the pockets, but otherwise, a great jersey.
The XL size is spot-on for me.
THE RIDE
Wave A was released at 5:30am, with yours truly, Ems Chua, Xander Chua, Bryan Rivera, Nick Bordeos, and “Kuripot Biker” blogger Jojo Bartolome among the UFB representatives present. As people navigated the initial 3km leadout into the main loop, it was immediately obvious that the regulars of the SM Mall of Asia “peloton” might as well have had a homecoming.
The Kuripot Biker himself, Jojo Bartolome, astride his blue six-speed Brompton.From left to right: Ara, Pao, Jogh and Phoenix.Me and Timothy at the start gate. I’m on my TCX, while Timothy’s white Giant Anyroad 1 lies in the background.Photo courtesy of Alaska Cycle Philippines/Sunrise Events.
In the early minutes there was a bit of wind to power through. The open asphalt and lack of shelter meant that a number of pacelines soon formed, with cyclists drafting one by one in measured efforts. This is in direct contrast to the start of BGC Cycle Philippines 2014, where the atmosphere was more “every rider for himself” and people pushed themselves “into the red” almost immediately.
Alaska Cycle Philippines makes the front page of the Philippine STAR’s May 18, 2015 issue as Wave A riders are shown being released.
Unfortunately this event would prove to be just as accident-prone as its November cousin.
For some reason, a 10km run coincided with Alaska Cycle Philippines – and used the exact same route. This resulted in me and other cyclists almost running over a few runners as we climbed the flyovers – which were slow areas by default not only because of the climbing, but also due to the bottleneck they created. The presence of the runners just complicated things no end. Sunrise Events insisted that they had secured all the necessary clearances and permits from the local government units, and did not know why this footrace was allowed to push through while its event’s cyclists were still out. I hear they may plan to take legal action on this matter as of this writing.
“Excuse me, space man coming through”
Even with the runners having largely gotten out of the way by lap 2, there were still quite a few mishaps. I heard a few cyclists hit the asphalt mid-ride. Some participants succumbed to mechanical issues; I saw one of the SM Mall of Asia regulars coasting on his bike barely carrying speed due to a snapped chain. As the early starters caught up with the slower riders, the more inexperienced cyclists posed a danger because they were weaving side to side and not paying attention to approaching faster riders to let them past. One of them weaved so far left that he hit a traffic cone and sent it flying into the other lane where oncoming participants were pedaling.
My average speed at the event as measured by my Cat Eye Commuter cyclocomputer.
After four laps around the main loop, I turned off into Gil Puyat Avenue to ride to the finish. I heard a lot of complaints from riders losing track of the number of laps they had done, losing time because they put in more distance than was necessary. It was starkly, immediately more serene as I joined fellow Wave A riders and cheered them on. Sprinting down Seaside Boulevard for the final 200 meters, headlights on and whooping like an idiot, I finished in 1:21:12. This was ten minutes faster than the same distance six months ago, at an average of almost 30 km/h. Not too shabby.
Crossing the timing beam at the finish line…while whooping like an idiot 🙂Timing results from the event – released less than two days after. Timothy did a scorching 1:18:17, while first-timer Jojo put in a respectable 1:41:36.
POST-RIDE
That favorite Cycle Philippines recovery meal, the Sausage McMuffin, was waiting for the finishers. It’s a good shot of protein, sodium and some carbohydrate – you could do much worse as far as recovery foods go. As with the hydration stations, bottles of Gatorade were being handed out as well.
Timothy’s Anyroad 1 and my TCX SLR 2 cooling off under a palm tree.
ABS-CBN news crews were on site interviewing a lot of the finishers. Those that weren’t headed to the photo booth, where a long queue was forming up. I felt the onset of cramps on my glutes and quads on the final sprint to the finish, so I quietly ate my meal and walked my bike around the baywalk.
Mishaps, jersey shortages, questionable ride pack inclusions and cramped route aside, overall this was a good ride. I had invited a number of first-time Cycle Philippines participants, and all of them finished safely and happily.
We’ll see you again in November.
Me and my TCX SLR 2 at the start.Me and my TCX SLR 2 at the finish!
When was the last time you changed out your bike’s cables, lubed your chain, or checked the thickness of the brake pads? If you ride your bikes often, chances are you’ll want to keep tabs on their maintenance.
Many people have smartphones these days, and “there’s an app for that” is a popular reply for many potential problems. As it turns out, it also applies for bicycle maintenance. Feedback Sports, a company famous for its repair workstands and bicycle tools, now has an eponymous, free app that lets you focus on just that.
REQUIREMENTS
Operating system: Android 4.0 and up; iOS 7.0 and up
Clicking on the (i) opens the Bike Profile screen with your input details.
INITIAL SETUP AND USE
You start by making a “profile page” for each of your bikes. The profile contains your bike’s name, make, model and serial number; purchase details; fit specifications; stats such as distance run and weight; and a portrait (vertically oriented) photo of the bike.
If you have multiple bikes you can see all of their profile pages in the My Bikes tab.You can also switch between your bikes on the home screen by swiping left and right.
Once you have a profile page for your bike, you can now add components in the Component List screen. These fall under one of six categories:
Frame, Fork and Headset
Drivetrain
Handlebar, Saddle and Seatpost
Wheels and Tires
Brakes
Accessories
Under each of these categories, there are several more specific sub-categories of parts; e.g. the “Wheels and Tires” category has hubs, rims, spokes, tires and tubes. Each item will have the date added, as well as optional details like weight, cost, and extra details in the description.
The initial entry of all these bike components into the app is admittedly a bit of a tedious grind, especially since modern bikes have a bevy of them. If you’re a completionist, a typical bike will have twenty to thirty entries in the Component List screen alone. The good news is you have to do this only once. The only time you’ll have to revisit this screen for editing is if you add new components and/or remove old one when they get replaced.
Feedback Sports also allows you to export the Component List in the app as a CSV file for easy editing in a spreadsheet program, such as Microsoft Excel or LibreOffice Calc.
THE APP AS MAINTENANCE MINDER
Once you’ve input the details of your bike, you can now make use of the Maintain screen to input maintenance records. As with the Component List screen, Feedback Sports classifies maintenance records under the six main component categories and their sub-categories. From there, you enter the maintenance date, a top-level description of the maintenance done to that particular part, and a more detailed description if you so choose.
Editing an existing maintenance record. Funny enough, you can’t delete any of them.
Before you save each new maintenance record, you’re given the option to set a date-based maintenance reminder for that particular item. This will show up on the Reminders screen as a checklist organized by date. This is helpful for such periodic maintenance jobs such as checking chain wear or overhauling your wheel hubs.
The Reminders tab with all the reminders you’ve set up per bike. A reminder will disappear when you tap it as “checked.” It will disappear after you leave this screen.
Once you’ve saved enough maintenance records, they show up on the Maintenance Records screen. From here, you can see at a glance just how long you’ve been riding with old, corroded cables and a neglected chain. You can also filter through the records to search for particular maintenance jobs. As with the Components list, you can also export your maintenance history as a CSV file.
The Maintenance Records screen.
FINAL THOUGHTS
My complaints are few. There doesn’t seem to be a way of removing a maintenance record you’ve entered as a test value, or by mistake – any maintenance records you input and save seem permanent. Also, this app isn’t smart enough to associate ridden distances (or “odometer readings” if you prefer) to wear components such as chains – not by itself, anyway. If that’s how you roll, you’ll have to do that in a roundabout way, via the description field provided for each component.
Finally, while the app allows exporting of data as standard CSV files, it doesn’t seem to allow importing them into the app. Not everybody has the patience for the tedium of such data entry using a smartphone.
Overall, I like the Feedback Sports app. It’s not flashy and its no-frills approach may be a little boring, but over a few months of use it’s been very helpful in keeping track of my bikes’ consumables. It’s the not-so-sexy stuff, like brake and shift cables, brake pads and the chain, that contribute the most to how your bike actually feels to ride, so keeping an eye on their condition pays off in the end for people who ride their bikes often. It’s a good tool to use for the maintenance-minded among us riders.
Holy Week in the Philippines is usually characterized by a mass exodus from Metro Manila, which leaves the metropolis quiet and open for pedal-powered adventure. Many riders celebrate this by embarking on their version of a Lenten pilgrimage: the visita iglesia done by bicycle, called – surely enough – the bisikleta iglesia.
The way most people celebrate this tradition is by visiting various churches on Maundy Thursday in an attempt to complete praying the fourteen Stations of the Cross, each one commemorating an event in the passion, death and resurrection of Jesus Christ. Some people visit fourteen churches, some others visit seven. At any rate, it also doubles as an excuse to get out and see more of Metro Manila as it goes dormant, its usual hustle and bustle subsiding.
Bearing in mind that the provinces would be full of vacationing Manila folk, I plotted a route around the south of the metro, chaining seven familiar churches together in one ride. I set my Cat Eye Commuter’s ETA function to 70 kilometers to have a real-time estimate of when we would finish our ride. We set out from Parañaque at 6:00 am, a little incredulous of how brightly the sun shone at such an early hour.
National Shrine of Mary Help of Christians, Parañaque City. Our first stop.Presentation of the Child Jesus Parish Church, Parañaque City. Our second stop.
Onward we pedaled, at an easy pace, to Alabang.
St. Jerome Emiliani Church, Muntinlupa City. Our third stop.St. James the Greater Parish Church, Muntinlupa City. Our fourth stop.
From Alabang, we doubled back through BF Parañaque and made our way to the SM Mall of Asia area in Pasay. As we refueled at 9:30 am, the summertime heat was making itself noticed. We started to pick up the speed.
Shrine of Jesus, the Way, the Truth and the Life, Pasay City. Our fifth stop.
From Pasay, we rode along Gil Puyat Avenue to Makati, which to our surprise still had buses and jeepneys plying its length.
St. Andrew the Apostle Church, Makati City. Our sixth stop.
By the time we arrived at our penultimate church in Makati, it was 11:00 am and the searing heat was relentless. Not only was it coming from overhead, it was also getting in our faces reflecting from the asphalt. One final push toward Taguig remained.
Santuario de San Antonio Church, Makati City. Our final stop. Now to head back home…
Eighty kilometers and four and a half hours later, we had made it back home.
Success!
Looking back, perhaps we should have kept a slightly faster overall average pace in the early hours. That would have ensured completion of the distance while minimizing our exposure to the heat.
This was one of the most memorable rides I’d embarked on. This was not the longest; that goes to a 102 km effort, but that involved several loops within a large village, and that began to turn a little monotonous. This ride was a little shorter, but didn’t have much repetition involved, and it was much easier to stay engaged. This was a genuine challenge, and I relished every minute of it.
The pedals are one of three main contact points you have with your bike, and it makes sense to get some good ones. I’ve mentioned the Shimano Saint pedals in previous posts, but haven’t dedicated a review post to them yet.
FEATURES
Weight: 500g for the pair
9 traction pins per pedal face, installed from the rear via included Torx wrench
Traction pin height adjustable with included washers
Mud shedding design
Install with either a 15mm pedal wrench/open wrench or a 6mm hex wrench
Reliable Shimano cup-and-cone bearing and spindle system for maintenance
IMPRESSIONS
The Saint pedals come in this nice box.
Saint is Shimano’s mountain bike groupset for gravity racers and downhill riders, so these pedals are expected to withstand the rigors of extreme trail abuse. Some MTB friends have said that these pedals will likely outlast the bike they are installed on. With that logic, I thought they should be a good fit for the TCX SLR 2. I’m not quite sold on clipless pedals and cleated shoes for my riding purposes, and these seem to be some of Shimano’s best flat pedals around.
All the box contents. In the plastic bag with the rebuild manual, you can see the extra traction pins, washers and Torx key.
The MX80 pedals come in a spiffy box, with the right and left pedals individually wrapped. They come with instructions for rebuilding the pedals, should you want or need to service them. They also come with the handy Torx wrench (I believe it’s a T10), which you’ll need to install or remove the traction pins.
The pedals themselves are a nice black and silvery-white color, with a splash of gold on the spindle. Viewed in profile, they have a slight concavity to their shape, meant to better locate your foot onto the pedal face.
The Saint MX80 pedals in profile.
Out of the box, they have a complement of 28 traction pins installed, seven per pedal face, and each of the pins has a washer. Eight spare pins and washers are kept in a bag, either as spares or for filling all nine pin slots per pedal face. The traction pins install from the rear, meaning damaged pins can still be removed. Removing the washers exposes more of the traction pins’ length and should dig deeper into the soles of your shoes, literally biting into them.
If you’re not careful, however, these same traction pins can bite into your calf, ankle or shin. If you get self-inflicted ankle wounds from these traction pins, make sure you get them cleaned and disinfected ASAP. An infected ankle will definitely hinder your mobility – and really hurt!
After some trial and error, and the misfortune of an infected ankle, I ended up removing the pins on the inside edges of the pedals. The remaining pins are now all on the perimeter of the pedal body, with the center forward pin relieved of its washer for better bite on the front. This setup works well for general riding and commuting purposes on asphalt.
Fresh out of the box.
As for the pedals themselves, they are really solid platforms for putting your leg power down. I haven’t wanted for more stiffness out of them. They could perhaps use a bit of a diet, but I wouldn’t trade reliability for lighter weight. Mine are scratched up from daily use, but still spin smoothly with buttery resistance – no service needed yet.
Scratched up and dingy now, but still going strong.
VERDICT – YEA OR NAY?
I got my MX80 pedals for PhP2,000, and they have been utterly reliable. All indications point toward them staying that way for months or even years to come, and they are easily serviced once they need some TLC.
If you come across a pair at a good price, buy them. You will not be disappointed.
“Degreaser? Anong degreaser? Walang ganyan sa bundok namin ma’am, sir…”
A 946mL spray bottle of Simple Green Multi-Purpose Cleaner next to a 1L bottle of PowerClean Water-base Engine Wash Degreaser. The simpler bottle is more than two times cheaper.
Technically, you could use dishwashing liquid in a pinch. Some of them advertise themselves as “grease strippers” and they do perform a fairly good job. I’ve used Simple Green Multi-Purpose Cleaner on occasion as well, but it’s not always available, and it can be a bit pricey at PhP175 for a 946mL spray bottle. There may be better, more dedicated solutions out there, I thought.
The orange liquid is very slightly viscous yet mostly free flowing as it comes out of the bottle; I was told by the PowerClean shop clerk that this can still be diluted if necessary. It’s mildly fragrant, too. Using it straight from the bottle in my Finish Line chain cleaner, I noticed how effective it was in removing the gunk from my chain and leaving it sparkling after 90 crank rotations. It works a little better than the lighter-weight, less viscous Simple Green in this respect, and it certainly sticks to the chain cleaner’s brush bristles better.
Simon Richardson shown here using an old paintbrush to “paint” degreaser onto a cassette. Photo is a screengrab from GCN’s “30 Minute Bike Wash” video – click on the photo to watch!Here, Simon paints degreaser on SRAM Red chainrings. Photo is a screengrab from GCN’s “30 Minute Bike Wash” video – click on the photo to watch!
Following the advice of others on bike washing upon my further reading, I got a cheap 1″-wide paintbrush and used it to “paint” the degreaser onto my drivetrain parts – specifically the cassette and chainrings. After doing so, the instructions tell you to let the stuff sit on the objects being cleaned for a few minutes…which you can spend drinking your cup of morning coffee and/or gulping some breakfast.
When I came back after twenty minutes, I saw the cassette now sparkling clean, save for a few isolated greasy spots. A subsequent light coating of the degreaser and some light persuasion with the paintbrush pushed the remaining spots away. My chainrings are black, so improvements aren’t so obvious, but they came out just as clean, too.
With minimal work, PowerClean’s degreaser sure did a number on my cassette. Imagine what it can do to a car’s dirty engine bay?This is the shiniest used chain I’ve seen in a while. The chainring teeth got pretty clean from the degreaser, too.
The degreaser effectively did the grunt work of cleaning up the drivetrain, which means you can ultimately use less of the stuff, expend less effort scrubbing, and save some money.
A caveat: Once done, you will need to make sure that you thoroughly clean it off the chain by using a hose with low water pressure and a rag. Any degreaser left over in the chain links will destroy any chain lube you apply inside the roller pins of the chain.
VERDICT: YEA OR NAY?
PowerClean sells their water-based Engine Wash Degreaser through its various branches (quite a number of them within Metro Manila) in either a one-liter bottle for PhP75, or a one-gallon (3.8L) bottle for PhP220. That’s a pretty good deal, and a one-liter bottle exclusively used for cleaning bikes should last a pretty long time. It helps the patriotic conscience no end that this, like the rest of PowerClean’s stuff, is made right here in the Philippines, too. Add to that the purported water solubility and green credentials of the product, and it’s a win-win situation in my opinion.
Highly recommended.
We are the United Folding Bikers. This is our official site. Its purpose is "to inspire and to inform". We love cycling and we'd like you to join us.