In many Anglo-Saxon countries like the UK and Australia, the media seem obsessed with pitting drivers and cyclists against each other.
Australian TV reporter Charlie Pickering, host of ABC’s “The Weekly” and an avid cyclist himself, sought to fix some of these wrongs – in a hilarious little feature that also now airs on YouTube as a standalone video. It’s definitely worth a watch.
As much as we are solving many problems as cyclists, we have to be responsible road users too, and follow the rules of the road. I believe it is our burden to set that example in order to sow the seeds of a better cycling culture. Ultimately we all have to share the roads – whether we be cyclists or drivers.
When I got the TCX SLR 2, I stated it doesn’t need upgrades other than a set of fenders and a rear rack. Unfortunately, these two items are very hard to find locally. Whenever people talk about racks for bikes, 95% of the time they refer to contraptions to hang them on a vehicle. Seldom do they think of an apparatus to help a rider carry his/her loads.
CAST YOUR BURDENS UPON THE BIKE
One reason why bike touring enthusiasts are able to pedal very long distances is because they let their bikes do their load lugging for them. Freeing the body from all burdens other than pedaling increases long-term endurance and comfort. This also benefits handling, as the center of gravity is much lower with a rack and panniers compared to carrying your load on a backpack. To do this, they invest in bike frames that accept the installation of racks – usually at the rear, but sometimes even at the front as well. This is usually done via threaded holes, called “eyelets,” found somewhere on the rear triangle. For rugged touring bike framesets that can carry a front rack, the fork legs will also sport eyelets.
With the right frame as the basis, the next step is to look for suitable racks to hang your panniers from.
Bicycles with disc brakes pose a peculiar dilemma when installing a rear rack. Most rear racks have a lower mount meant to mate with frame eyelets close to the dropout area. If the disc brake caliper is mounted on the seatstay, outside the rear triangle, mounting a rear rack becomes a more complicated affair as the rack’s lower mount has to clear the caliper somehow. To address this, rack makers have released products that are specifically meant to mount on frames that use disc brakes.
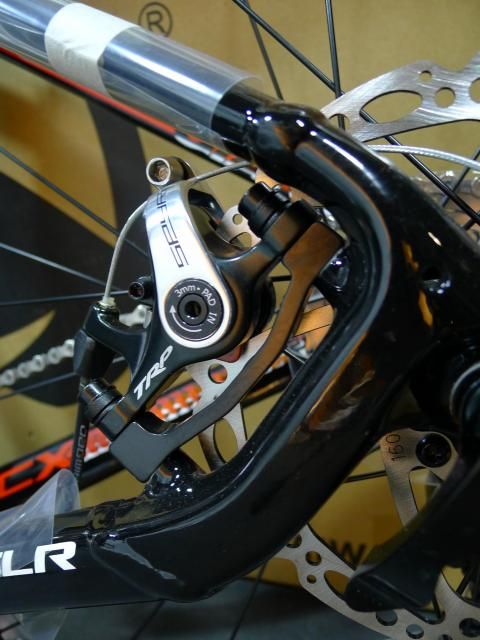
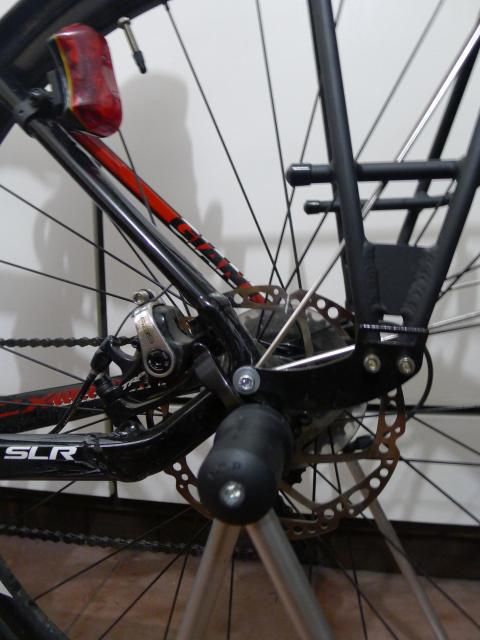
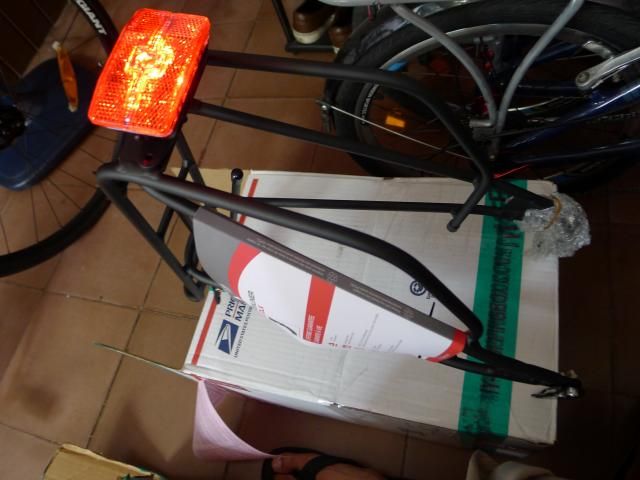
The TCX SLR 2 mounts its TRP Spyre disc brake calipers on the chainstay, inside the rear triangle. To the right is the “hidden” eyelet.
Many newer disc-brake road bikes mount their brake calipers inside the rear triangle, on the chainstay. This improves compatibility with rear racks and reduces the fuss of installation. The TCX SLR 2 is one of these bikes; in fact, this was one of my main criteria in selecting it.
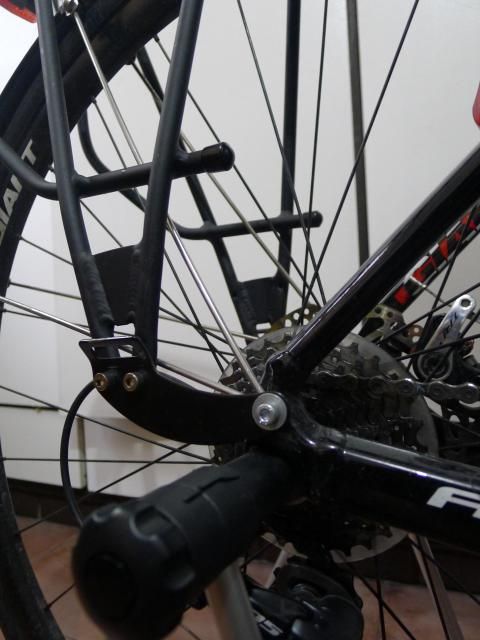
After reading a few reviews, I decided on the Axiom Streamliner Disc DLX rear rack. This is a 700g aluminum unit painted in matte black, rated for a maximum load of 50 kg (~110 lb). Unique to the Streamliner series are curved lower mount feet, which set the legs backward to increase heel clearance from pedal to pannier while pedaling. Incidentally, this feature also helps clearance from a seatstay-mounted disc brake caliper. The upper mount arms are also length-adjustable. Lastly, Axiom makes a big deal of how the Streamliner racks are more aerodynamic, with sides that taper toward the top, in an effort to bring the mounted panniers closer to the center line of the bike and reduce the frontal area. However, this tapering isn’t so noticeable on the Disc version.
INSTALLATION
Unlike the fiddly installation of the fenders, installing the rack was mostly hassle-free and straightforward. By comparison, the TCX SLR 2 is much better equipped to accept a rear rack. Both can share the same pair of eyelets down by the rear dropouts. All you will need are slightly longer bolts to ensure at least three turns’ worth of screw thread is left exposed through the eyelets, and washers to ensure the exposed bolt ends do not interfere with the chain in the smallest cog.
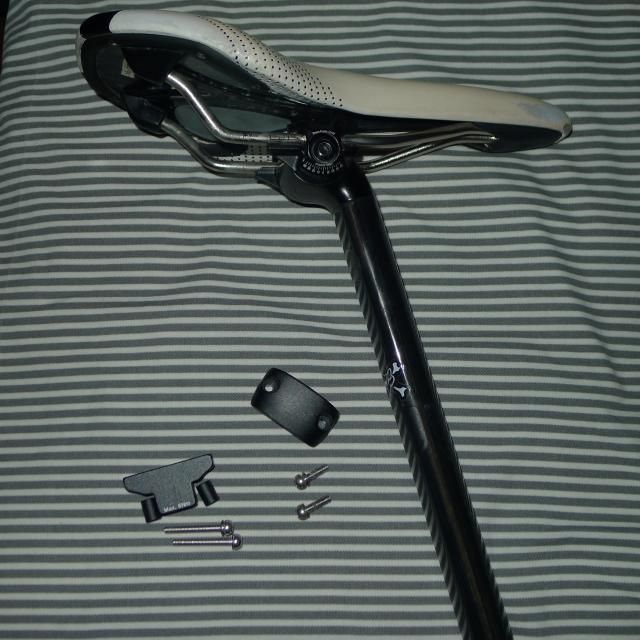
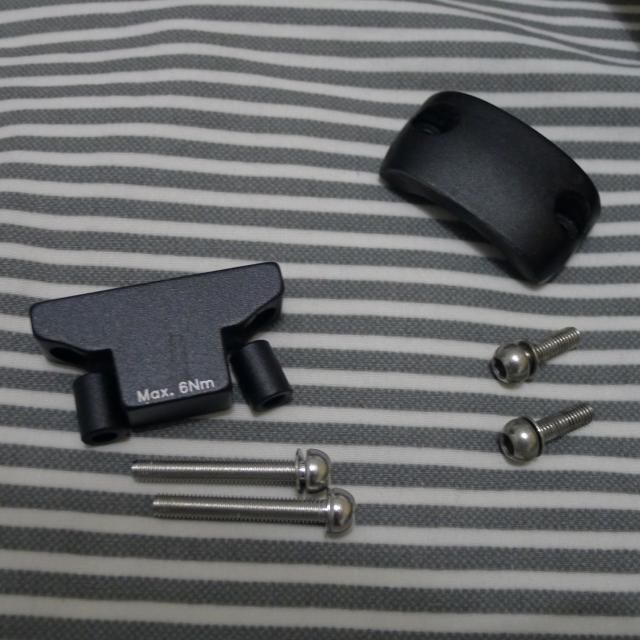
Seatpost removed from the TCX SLR 2. The round plate is the seatpost clamp plate and below it are the two original-length bolts. For mounting a rack, set aside these bolts and use the longer ones below the block adapter and cylindrical washers.A close-up of the block adapter, seatpost clamping plate, and the two sets of bolts. Regardless of rack, the max torque for these is 6Nm to avoid damaging the seatpost.
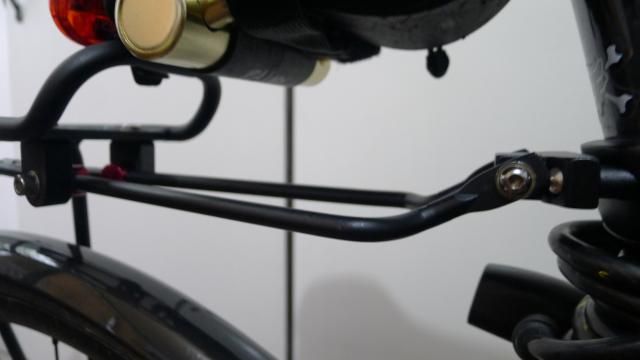
To mount the rack’s upper arms, Giant bundles a block adapter, cylindrical washers, and longer hex bolts for the seatpost clamp plate within the TCX SLR 2’s build kit. You remove the normal hex bolts on the seatpost clamp plate, then thread the longer bolts though the block adapter, cylindrical washers and seatpost clamp plate as you torque them into the bike’s top tube. The block adapter will provide the mount points for the rack’s upper arms. This is a neat solution, and you could easily run the bike with its rack removed, but the adapter block left attached.
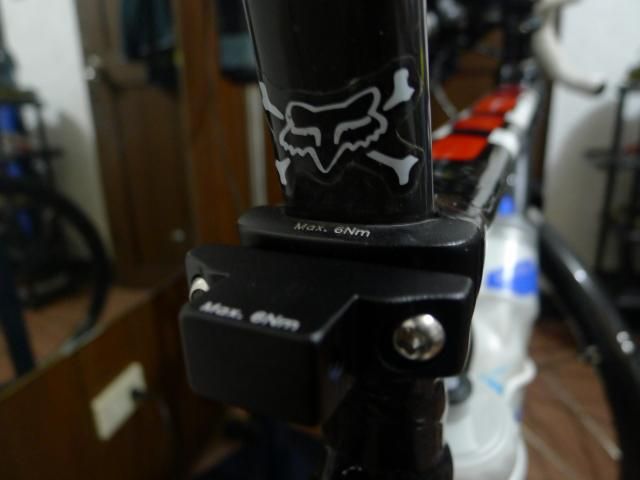
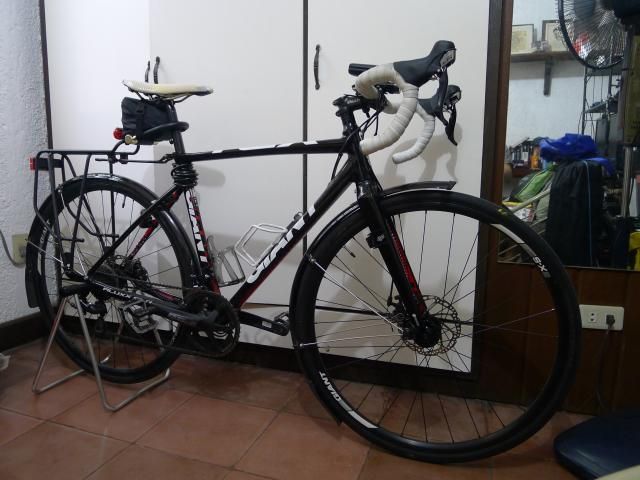
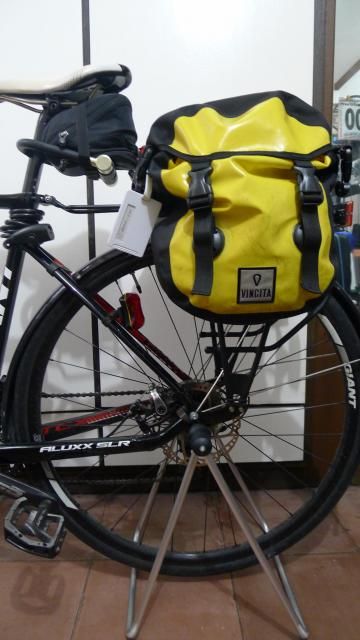
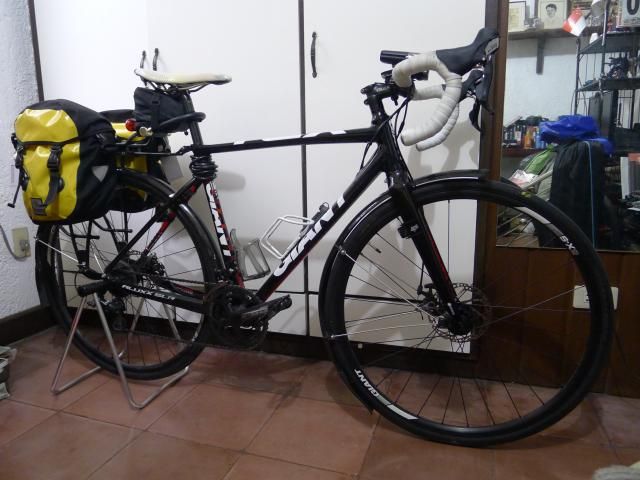
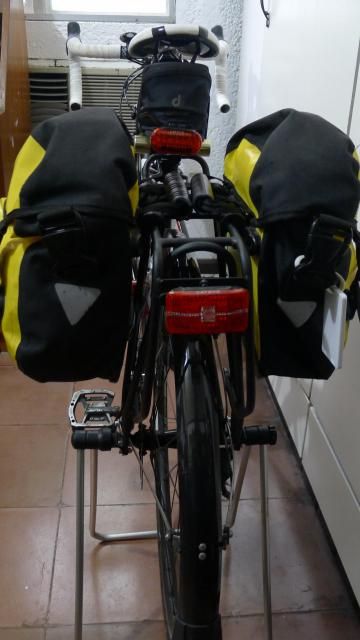
Rack mount adapter installed. Note the eyelets on the sides. Those are where the upper mounts of the rack will bolt into.Upper arms mounted to the bike. They telescope by loosening the side bolts on the left.Drive-side eyelet shared by the rack and rear fender.Non-drive-side eyelet shared by the rack and rear fender. No problems with the disc brake caliper mounting here.Rear rack install completeMy Vincita B050WP-A panniers mounted midway on the length of the rack. So far I have had no heel strike issues while riding with panniers.At last: My TCX SLR 2 in full commute trim!
Axiom’s build kit is comprehensive, coming with all the bolts and hardware you’ll need. I do question, though, the use of fragile 3mm hex bolts on the upper mounts, and needing 4mm and 5mm wrenches to adjust the telescoping length. I feel they would have been better off with using 4mm for everything, but it is what it is, I guess. The mounting is as simple as can be; I went into the install blind and the process went very smoothly. In operation, the Streamliner does its job without fuss, although daily use of the rack and any panniers you mount does scuff and scrape the matte black paint away, exposing the shiny aluminum underneath. That’s to be expected, as the pannier hooks will leave their mark. All things considered, the Canadian outfit deserves a medal.
BUT WAIT, THERE’S MORE
Like most other racks, the Streamliner unit has a mount plate for a rear safety light. I decided to mount a Cat Eye Reflex Auto TL-LD570R unit back there, which is both a standalone reflector and an automatically activated rear safety light. When the switch is set to its “active” mode, it turns on automatically by input from a light sensor and a motion sensor, and will turn itself off after thirty seconds of inactivity. This is a great idea, as with a simple modification, you could ride knowing that you always have a rear light working to keep you seen by other road users.
The Axiom rack’s mount plate for a safety light. In the foreground is Cat Eye’s rack mount bracket. Not seen here is a theft-deterrent measure: the bracket has a screw and washer designed to lock the Reflex Auto into place.Cut off the two plastic loops as these will be used for the mounting of the bracket to the rack with supplied screws.The Reflex Auto light mounted to the rack.
The only modification I needed is to disable the light sensor, by covering it with some electrical tape while the light body is open. This “blinds” the light sensor, and effectively turns the safety light on with only a shake or movement of the bike.
As a safety light, the Reflex Auto isn’t too shabby either. It offers five different modes:
random strobe 1
random strobe 2
pulse glow
regular flash strobe
steady glow
The rear of the rack with the Reflex Auto tail light mounted. Axiom’s advertised upwards “taper” of the Streamliner racks isn’t very obvious on the Disc version – which is no big deal.
Of all the modes I make use of the pulse and steady glow ones the most. I have two other safety lights so I relegate those for flashing purposes. This functionality is helped by the sheer size of the light unit; you effectively have a palm-sized red rectangle on your bike when it’s on, visibility is good even on the sides, and it doesn’t have to resort to obnoxiously bright LEDs to get you noticed by other road users. A sexy tail light it ain’t, but it’s one of the better-thought -out ones.
With this, my Giant TCX SLR 2 “all-weather commuter bike” project is mostly complete. I can think of only a few things left to change out or “upgrade” on the bike, and those are for comfort or maintenance/maintainability purposes.
In perhaps my favorite Global Cycling Network video yet, the boys take four distinctly different bikes and ways of getting from Bristol to their HQ in Bath, 20 km away.
Photo credit: Global Cycling Network, 2014Photo credit: Global Cycling Network, 2014
Tom Last is astride a Specialized cyclocross bike with a single 40T chainring and cantilever brakes, riding and running through the paths and trails less taken.
Photo credit: Global Cycling Network, 2014Photo credit: Global Cycling Network, 2014
Matt Stephens is on a Trek endurance road bike, slightly more upright and fitted with full-length fenders (or mudguards, as the Brits call them), gliding through quieter streets and bike paths.
(I just have to say though…wow, Shimano Dura-Ace drivetrain parts on a commuter bike?!)
Photo credit: Global Cycling Network, 2014Photo credit: Global Cycling Network, 2014
Simon Richardson has a swoopy Canyon Aeroad road race bike under him as he knifes through traffic on the A4, a busy British main road.
Photo credit: Global Cycling Network, 2014Photo credit: Global Cycling Network, 2014
Front lights, in particular, occupy a broad spectrum of options. There are low-powered models that are meant to increase a cyclist’s visibility to other road users, but don’t do so well for illuminating the road. Other models rated for higher light output can cut through the darkness and light up your way as you pedal, highlighting potholes and road acne in advance so you can take avoiding action.
The light I’m reviewing today undeniably belongs to the latter category. We take a look at Cat Eye’s Volt 1200.
FEATURES
High-intensity white LED x2 in OptiCube beam-shaping housing
Box contents: The Volt 1200, FlexTight bracket and microUSB cable.
The Volt 1200 comes in a nice cardboard box. Inside are the light itself, the micro-USB charging cable, instruction leaflet, and the FlexTight handlebar mount bracket. This is the exact same mount used by my other front light, the much smaller and lighter Cat Eye Nano Shot (HL-EL620RC).
The Volt 1200 disassembled by a hex key. The SD card is there for size comparison.
As an all-in-one torch-type unit, the black cartridge battery is pre-installed into the lamp body, mounting via three bolts. You can undo the bolts with a hex key and mount a spare battery if you had one, but obviously this isn’t a quick affair. Besides, the huge battery is enough for most rides, especially when kept out of the higher-output modes. At 6200mAh, it dwarfs most cellphone batteries in pure capacity. My own Lenovo P770 smartphone has quite a large battery at 3500mAh; the Volt 1200 practically doubles that.
The aluminum body of the Volt 1200 acts like a heatsink, with a row of ridges on its top. Running at 600 or 1200 lumens means this can become quite hot, which is normal. The light has a little sticker on its underside warning of this, next to the rubber gasket flap for the micro-USB charging port.
PERFORMANCE IMPRESSIONS
The first time I turned it on, I laughed maniacally. An honest-to-goodness 1200 lumens! This is a seriously strong light in Dynamic mode, and it can temporarily blind people when aimed the wrong way. The beam is so potent that it handily outshines most indoor lighting. Headlight aim becomes critical when using the Volt 1200. I find it’s better angled slightly downward, 15-25 degrees from horizontal. The sheer volume of light means you will definitely be seen – it’s best employed by illuminating your path, and by brute force it will light up quite a way into the distance.
1200 lumens from the Volt 1200 vs. 200 from the Nano Shot. The bigger light throws the light farther.
In terms of beam shape, the OptiCube reflectors and optics tightly control it to give you a focused rectangle of light with minimal spill, instead of a floodlight effect. Some people may want more peripheral light, but I find that the tight beam works well when you’re pedaling at higher speeds.
You’d think the 214g Volt 1200 would overwhelm its tiny FlexTight bracket, but this isn’t the case. Tightened properly, I never had a problem with the light drooping on the bar at all, even through bad roads.
OPERATION
Most people will see this light and think “I don’t have use for a 1200 lumen front light!” Well, true, in most cases it is overkill. However, the real draw of the Volt 1200 is how versatile it is. If the max output was the only good thing about this light, this review would have ended already.
The five modes are all good compromises between light output and battery life. You cycle between the main modes in decreasing order of brightness using a single press of the top button (Dynamic -> Normal -> All-Night -> HyperConstant, then repeat). Pedaling along East Service Road at 10 pm, at 18 km/h average speed, I used the 600-lumen Normal mode most of the time to light up the path, while being seen by the cars and trucks that ply the route. I reserve the full 1200 lumens for short bursts in very dark spots. In the daytime, I run the HyperConstant mode, which is a constant 200-lumen beam with a 600-lumen flash strobe, and this helps with visibility.
Below are sample beam shots taken with my camera. The light is mounted such that it is around 20 degrees down from horizontal. Settings are constant across all photos: ISO 400, an f/2.8 aperture, 1/2 second shutter, and 50mm-equivalent focal length. For distance reference, the white vehicle in the distance is 100 meters away.
Volt 1200 off.Volt 1200 in the 200-lumen All-Night mode. The steady beam of HyperConstant mode is the exact same brightness.Volt 1200 in the 600-lumen Normal mode.Volt 1200 in its maximum Dynamic mode. Even with the light angled around 20 degrees down from horizontal, it’s still illuminating around 60 meters of the road ahead.
Perhaps the only mode I don’t use at all is the Flashing mode. This turns the light into a high-powered blinker with an annoying pulse frequency. I prefer HyperConstant for this purpose, as the pulses aren’t so quick, and the constant beam gives oncoming traffic a better way of estimating distance between you and them.
Unfortunately, accessing the Flashing mode inadvertently (a double-press of the button, accessible at any time) is done way too easily. In practice, you may find that while trying to turn down the brightness, pressing too quickly triggers the borderline obnoxious Flashing mode.
The gasket and contacts on the massive 6200mAh battery.
Once the Volt 1200’s button glows red, it’s time for a recharge. Left alone long enough, it will automatically step down in output to squeeze as much run time out of the battery. At 6200mAh of capacity, charging this beast will take a while, and I would suggest investing in a high-current USB charger. The Volt 1200 has a useful way of discerning between normal and high-current charging. Normal charging leaves the button glowing red, while high-current charging is shown by a slow-cadence flashing.
VOLT 1200: YEA OR NAY?
I’ll get to the elephant in the room: this light isn’t affordable. Cheapskates are going to shy away from this light from the price alone, no matter what merits it has.
That said, 1200 lumens hasn’t been priced like this before – not from an established lighting brand. Not too long ago, you had to pay an arm and a leg for a light of equivalent output – and not in an all-in-one unit, to boot. Year on year, the improvements in bicycle lighting technology have become so great that my 200-lumen Nano Shot has been overtaken by the Volt 300 three years later, which packs 300 lumens in a package that’s half the price. If you look at the Volt 1200 as an investment, in that you’re buying a torch-type light that is ahead of the technological curve for about five years, coupled with the potential of buying replacement batteries…the price tag doesn’t seem too bad.
The remnants of what appear to be aluminum oxide between the cooling ridges. I’ve scratched most of it off with my fingernail.
Also worth noting is that the bare aluminum on my own unit has shown a few signs of cosmetic minor corrosion. This is most evident in the clingy greenish hard powder in between the cooling ridges (which I assume is aluminum oxide) and some blistering on the underside. No adverse effect on the light’s function, though, and it might simply be due to my sweat falling on the lamp’s metal body. The Volt 1200 is still as solid as the day it was unboxed.
The blistering on the underside. It’s usually found where the stickers are. It doesn’t look great, but it’s all cosmetic and doesn’t affect the functionality at all.
You may question the value of a 1200-lumen headlight, but the great thing about the Volt 1200 is that it is so much more than that. The capacious battery, great beam control, and a thoughtful selection of modes mean that this multi-role light excels at endurance – it can be the light you need it to be. Mount it to a mountain bike, turn on Dynamic mode, and see the trail light up right in front of your eyes. In practice, while riding with the light in HyperConstant mode in the daytime and Normal mode at night, over a total of two hours’ commuting per day, the battery will last a week with juice to spare. Charge it overnight using a good high-current USB charger, and you’re good to go the next day for another week’s worth of riding.
VERDICT
Reliable, powerful and well thought-out – one of the better lights around. An investment worth saving up for.
As of this writing, we are smack dab in the middle of the rainy season. Riding a bike in this kind of weather presents its own risks and downsides – not least of which is a grimy, dirty stain down your shirt and butt affectionately called by cyclists as “the skunk stripe.”
See how grimy this guy’s butt and back are? That’s the skunk stripe in action. Photo courtesy of bikecommuters.com.
This large stain is a headache to rain riders because it is so hard to launder out of the fabric. While the rain falling from above is pretty clean, the water from your riding surface is anything but. In the first few minutes following any rainfall, the oils from the asphalt and passing vehicles leach out into the road. Not only do these tend to decrease the grip of your tires, they also make for a binding adhesive for dust and dirt. If this stuff is thrown up by your wheels’ spray and ends up on your clothing, I bid you good luck washing it out. This spray also isn’t good for your front derailleur and crankset, either.
Remember my Dahon Vitesse T10? It had SKS fenders as stock. These seem to be a hot-ticket item on selling forums, too.
Many folding bikes come with very good full-length fenders installed as stock equipment, and they are very effective at keeping you clean as you ride. If you move up to a road bike, however, what options do you have? Most fenders available locally are MTB-style jobs which don’t offer anywhere near the same amount of coverage.
Made of a sandwich construction of plastic and aluminum
45mm wide, will fit 700c tires with widths from 28mm to 37mm
Secu-Clip safety feature on front stays – designed to release when foreign objects get wedged between the front tire and fender
Stainless steel stays
All mounting hardware included
OUT OF THE BOX
Retail packaging
SKS weren’t kidding when they said the Longboards – an offshoot of their long-running Chromoplastics series – are their largest, fullest-coverage fenders available. I mean, just check out the rubber mudflap on the front fender.
How low does your front mudflap go?
The “P45” designation means these fenders are 45mm wide. SKS recommends fenders at least 7mm wider than the tire tread width, so the P45s are the way to go for a cyclocross bike with 35mm-wide tires in a typical configuration. A road bike running 20-28mm tires will be better served by the P35 variant.
Inside the packaging are the fenders, the front and rear stays, the instruction sheet, and a bag containing all the washers, nuts and bolts, as well as the fender stay end-caps and the sliding bridge piece for the rear fender. You’ll need a 4mm hex key for the bolts, an 8mm socket wrench for the stay nuts, and a metal saw or hacksaw to cut the stays down to size. Bring out a permanent marker and tape measure, too, and a vise would be very useful.
Contents. The front stays have the black Secu-Clip fittings. Wrapped in plastic is the rear fender.
INSTALLATION…
The installation instructions are some of the worst I’ve seen. I’m used to seeing quality diagram-based instructions while installing everything from plastic models to car underbody parts, but SKS has the bare minimum of diagrams and resorts to explanation to walk the user through. You’re better off watching installation videos from YouTube instead.
Here’s a comprehensive one from Rivendell Bike Works.
Here’s one from SKS themselves.
Basically you will want to approach the install in the correct order, especially for the rear fender. It is meant to be anchored in six places: the chainstay bridge, the brake bridge, and then two points each for the left and right stays. Adding complication is that while the TCX SLR 2 has fender eyelets for the stays, it has neither of the two bridges, as it is a cyclocross bike equipped with disc brakes and designed for mud clearance. Conventionally you will want to anchor the rear fender by the bridge piece and chainstay bridge before having anything to do with the stays. For the TCX, I did this by repurposing a reflector mount and using some long zip ties.
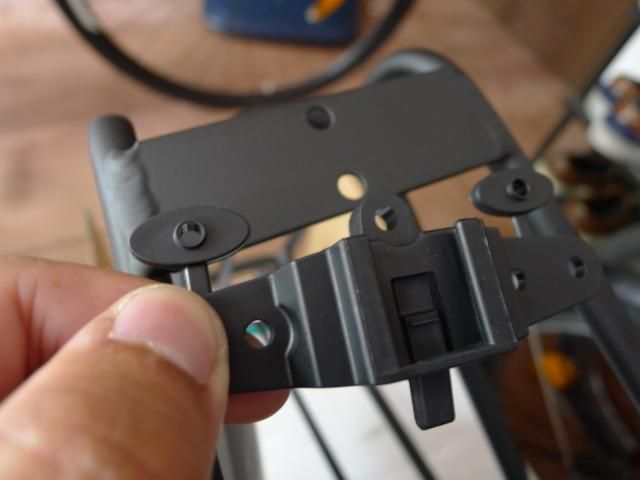
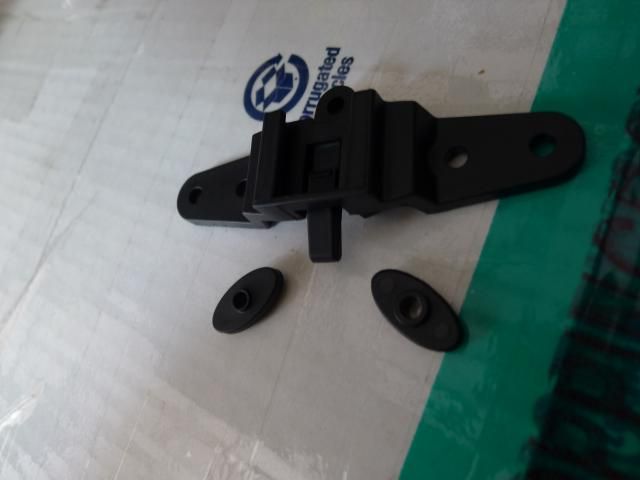
In a former life, this plastic piece used to mount my rear reflector. Now it holds the rear fender’s sliding bridge in place.
The biggest headache you will likely encounter during installation is the proper sizing and cutting of the stays. Keep in mind the old adage “measure twice, cut once,” as it can be very easy to cut too much off the stays, leaving you with no way to vertically locate the huge fenders properly – unless you braze or weld the cut pieces back on.
Zip ties: they can fix almost everything on a bike. Here they are providing a mounting point near the seat tube, in lieu of a chainstay bridge.
…AND FINE-TUNING
Dialing in the fitment also happened in the first week post-install. On a disc-brake bike, you will definitely have to bend the stays inward. On the front fender, the bend is on the non-drive side to clear the disc caliper, while on the rear fender you will have to bend on the drive side to clear the cassette and freehub. The aim is to get the fenders as straight as they can, and eliminate any chance of the fender hardware rubbing on the spinning tire. Maintaining a one-finger-width gap from the stay to the tire will do.
This is how you fine-tune the fender gap and centering. The end of each stay is fixed by a special bolt, which threads into this hex nut right here. Loosening the nut allows the fender to slide up and down along the length of the stay, as far as the black end-cap will allow.
Lastly, you will want to reduce the fender gap to the slimmest possible without the tire rubbing on the inside of the fender. This is especially true for the front. If the gap is too large, riding the bike one-handed at higher speeds feels as if there is a parachute strapped to the fork and the winds are snatching the steering away from you. That extra-long front mudflap can also jack-knife on itself and fold over, rubbing on the spinning front tire and having a lot of its thickness filed down very quickly. Reducing the gap mitigates this.
PERFORMANCE IMPRESSIONS
After the frustration of installation, fine-tuning and adjustment, the SKS P45 Longboards are a great fender set.
The TCX SLR 2 now sporting its SKS Longboards on the original 700x35c Schwalbe Super Swan mud tires.
That low-hanging front mudflap might look odd, but it’s quite effective at keeping the spray out of your feet and toes. It’s also soft enough to bend out of the way in case you have to push the bike through a doorway with a raised step. Not even the front fender on my Vitesse was this good – it just doesn’t reach as low. It is worth all the effort to get the fender hugging the front wheel as snugly as possible.
With fenders cinched up and rubbing eliminated, the bike has no trouble hitting 47 km/h of flat sprint, and it’s stable riding one-handed.
Coverage of the rear fender. Riders will have no complaints following you down a wet road, since the fender contains most of the spray off the rear tire.
As good as the front fender is, the rear fender was the primary reason why I bought this set. My clothes and backpack now remain dry and grime-free whenever I ride through lots of standing water or a rain shower. The half-moon arc also effectively protects my front derailleur and crankset from road grime.
The Secu-Clip stay system on the front fender. I tried pulling the stays out of the Secu-Clips manually before installing them to the fork, and they didn’t release. There’s just enough movement in there to suggest that they’re supposed to come apart.
One final selling point of the Longboards for me was their color. Fitted correctly, black fenders on a black bike are virtually invisible – only the stays and a few dots of chrome give them away. SKS also makes these in silver and beige, all with black rubber mudflaps.
The TCX SLR 2 in street commuter trim and 700x28c Specialized Espoir Sport slicks. Perhaps a little less sexy than before, but way more functional. There’s some fender gap left to trim down in the front.
P45 LONGBOARDS: YEA OR NAY?
The installation is the only thing frustrating about this product, and you just have to accept that the procedure will vary depending on the idiosyncrasies of your bike. If you can wrap your head around the install and fine-tuning, these are simply excellent fenders.
VERDICT
Highly recommended if you can find a set. Just take your time and be patient with the install and fine-tuning.
Meet phoenix, a dream bike no more, acquired by trading up my atomic bike to a lightstorm and finally trading it plus cash for a peerless firebird, 3 – 4 months ago. Replaced a few parts from the build of the previous owner. bike to work bike everyday.
UFB’s Gilbert Serrano riding his road bike through a tree-lined avenue.
We once asked Gilbert Serrano of United Folding Bikers to share his experience with bicycle commuting. He is a good source on the topic, as his job requires him to show up in long-sleeved business attire.
===
SHOWER FACILITIES IN THE OFFICE?
First off, if your office has shower facilities, that’s a huge help. At our office, we just relegated a seldom used comfort room to be a “shower room”, although technically it’s a “tabo” (water dipper) room because there’s no real shower.
Gilbert’s Abnormal Broke V2 messenger bag. Click the image for Abnormal Bag’s Facebook page.
INVEST IN A COMFORTABLE BAG
I use a Broke V2 Messenger Bag by Abnormal (you can look him up on Facebook). It’s waterproof, made of 1000D Cordura Ripstop material with Tarp inner lining, well-balanced, and doesn’t cover your whole back. It also has a “third leg” stabilizer strap so your bag won’t spin around.
My Broke V2 carries
my MacBook
two phones
a pouch for chargers, cables and what-not
waterproof case for soap (it’s actually a repurposed waterproof cellphone case)
deodorant
small comb
I’m pretty spartan when it comes to office attire. I’m not into fripperies like colognes, gels and what-have-you, so it’s basically just soap and non-scented deodorant for me.
INVEST IN MICROFIBER TOWELS
I have a full-size TekTowel by Sea to Summit. Kind of pricey at PhP1299, but there are alternative microfiber towels in Handyman for about PhP300. What’s good with the TekTowel is, it has a case and it folds into a compact 6″ x 4″ x 1.5″ package, plus it remains super-light even when wet. After taking a bath, I hang it at the back of my chair and it’s dry in 10 minutes. I then just pack it away and stash it in my bag.
MAKE IT A ROUTINE
No secret really, I just come to work earlier. I leave the house at 7:00am, and get to the office by 7:30am. When I get to the office, I park my bike, then head straight to the canteen for a cup of coffee and just cool down a bit. When coffee is done, I head straight to the shower (“tabo”) room and take a quick shower, get dressed, and that’s it.
LIGHTEN YOUR LOAD – DRESS, PACK AND EQUIP CORRECTLY
I usually just pack a cotton long/short sleeve shirt, change of boxers, socks and chino pants. When riding, I use all-black Chuck Taylors , I use them in the office as well. Or you can do what I used to do: just leave a pair of office shoes in the office. I swapped out my clipless pedals to standard platform pedals so I can just wear one pair of shoes all day.
For the sweaty clothes, we have provision for hanging clothes in the shower room so I also bring two collapsible clothes hangers, which cost PhP120 at National Bookstore. (Don’t ask why there are hangers sold there, I was surprised too.) Or, you can just hang them there as is. They’ll be dry to wear going home by 5pm, the end of my office day.
Of course, pack the bike commute necessities, such as a basic multi-tool for your bike.
Gilbert’s EDC (every day carry) stash. More than just the typical puncture repair kit, he also carries a miniature first aid kit, zip ties, rubber bands, a luggage lock, and some spare links for his Shimano HG74 chain. He even has an old sport sock – for handling greasy situations.Gilbert’s chain tool and Topeak Mini 18 multi-tool, showing the built-in plastic tire levers.
I prefer to carry a spare tube rather than a patch kit, because it’s faster and easier to change the whole tube than patch one.
Don’t forget a GOOD hand pump. I also stash P100 in my toolkit, so I don’t have to pull out my stuff if I have to get a tube patched by someone else.
Don’t forget water, blinkers (especially if you ride up to night time), headlights, reflectors. I have a Hornit electronic bike horn as well, but most of the time, it’s easier to just shout “Bike! Bike! Bike!”
HOW FAR IS YOUR COMMUTE?
Think about this. I live in Novaliches and work in Valenzuela, about 10 kilometers away.
By car, it’s 60 to 90 minutes.
By motorbike, it’s about 45 to 60 minutes.
By bike, it takes 35 minutes, and I take the longer route to the office to steer clear of the trucks. It doesn’t even matter if I use my road bike, or my folding bike, or my mountain bike, it’s still 35 minutes maximum, maintaining an average speed of about 18 km/h.
Just a plaything? Just a poor man’s form of transportation? Just a hobbyist’s obsession?
We have, for some reason, rightly or wrongly, adopted the American way of thinking that bicycles are either children’s playthings, or sporting hobbyists’ pricey obsessions.
We have also added to all that, the local Pinoy notion that bicycles are a poor person’s form of transportation because we are averse to physical effort. Many Filipinos would rather queue up to ride a crowded bus, jeepney or train, instead of riding a bike to our destinations, because “it’s more convenient,” “I don’t have the energy” and “I don’t arrive in a wet sweaty mess.”
By extension, some of us have the notion that people who ride bicycles have no place on the public road, where the automobile rules supreme. “People who bike-commute must have some sort of death wish,” they may say. And yes, they do get bullied on the street.
You gotta wonder. How long will we be able to keep up this kind of thinking? Will we cling to this mindset while we are struggling every day – paying rising transportation fares through the nose just to get around a ridiculously overpopulated, smog-smothered and congested metropolis?
You tell me. I tend to be very jaded when it comes to Pinoy culture and its ability to unlearn mistakes and ugly cultural traits. We would’ve gotten rid of corruption, laziness, bad drivers and mendicancy/beggar culture a long time ago if we were truly serious about them, in my opinion.
And yet, despite all of these odds, despite even being rich enough to buy a car or two, despite the classic Pinoy cultural stubbornness and obstinacy…you have somehow decided to become a bike commuter.
Congratulations.
AS A FILIPINO BIKE COMMUTER, THERE ARE SOME HARD TRUTHS TO SWALLOW
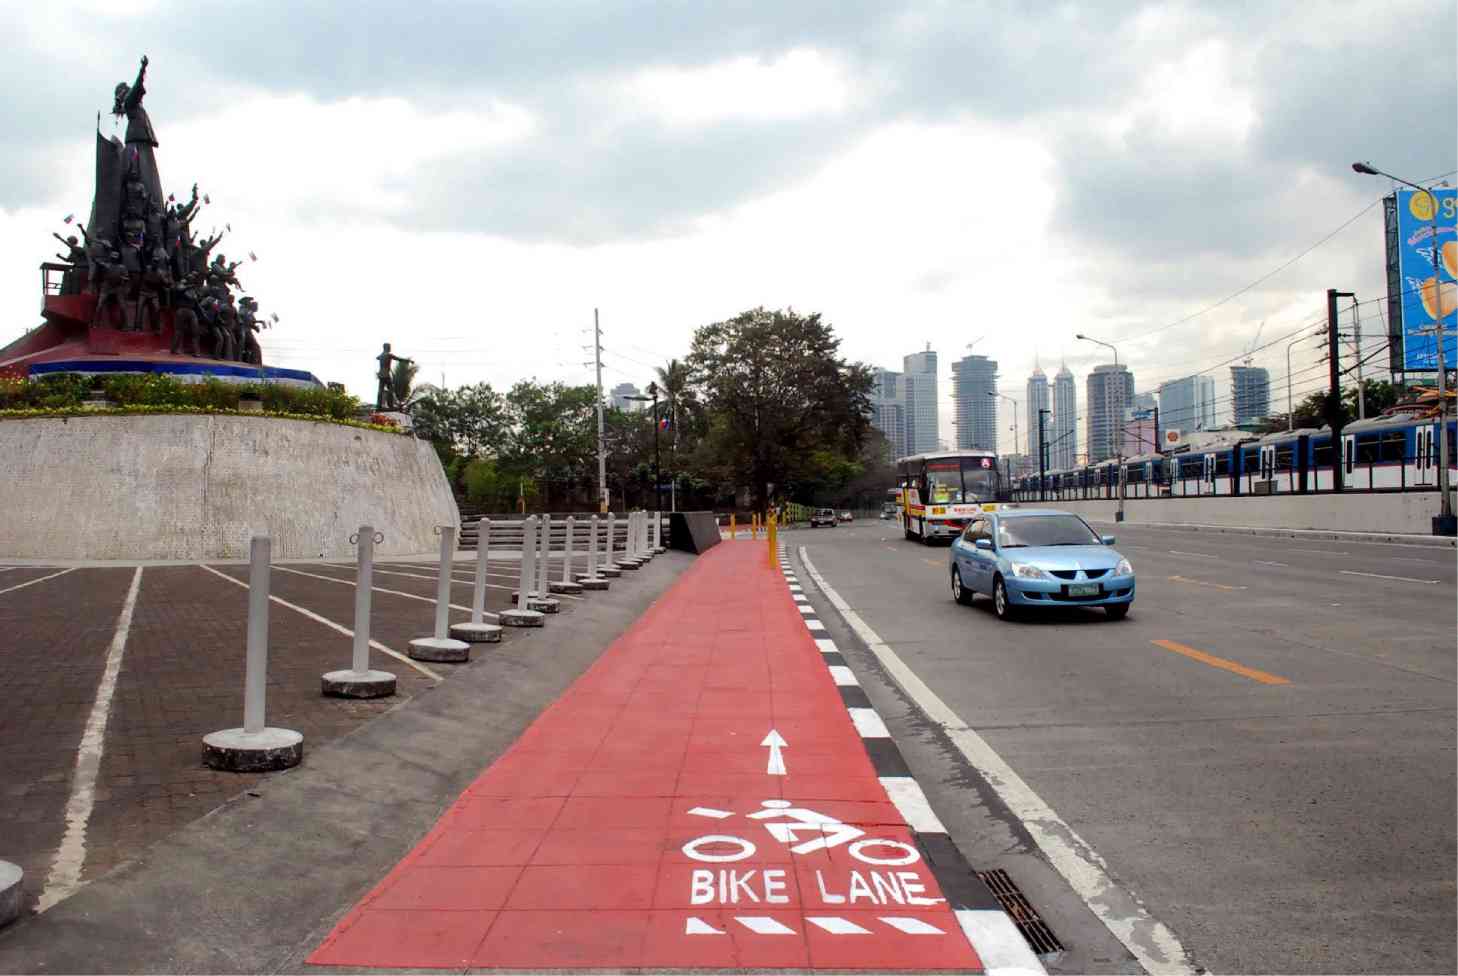
A bike lane in front of the Bonifacio Monument along Epifanio delos Santos Avenue (EDSA). Photo from the Philippine Daily Inquirer.
Let’s be honest.
The spiffy bike lanes we see in other countries are a utopian ideal here. They’re non-existent in many of Metro Manila’s so-called “cities,” and those that do exist are terribly designed (red paint on a converted tiled sidewalk?! good luck in the rain) or abused by vehicular traffic. Nowadays I don’t even think about bike lanes any more, as they are the exception rather than the norm. Bike lanes or no, I think a Filipino bike commuter must learn how to behave like a responsible road user by keeping with the flow of traffic, being vigilant, practicing proper lane etiquette, and using hand signals.
Compared to almost any form of motorized transport, the safety of riders on two wheels rests more squarely on the “active” side of the equation rather than the “passive” side. Think of active safety as accident avoidance; riding in such a way that you don’t get into one in the first place. For most of us riders, the only bit of “passive” safety we have is our helmet – and body armor, if you ride that way.
Motorcyclists have the benefit of motorized boost – twist open the throttle, a butterfly valve opens, and a motorcycle rider gets additional speed. By comparison, us bike commuters earn our speed. If active safety were measured by the amount of time we can maintain motion, momentum would be our gold standard currency. Our acceleration when in motion is not nearly as instantaneous. We usually need to grab a gear and raise our cadence by 20 RPM for a meaningful increase in speed, and whatever amount of speed we can carry on a bike takes effort to build back up after a standstill or an uphill slope.
Lastly, air pollution is an ever present danger. Then again, it will hunt you down whether you are a bike commuter, pedestrian, or vehicle driver, anyway. For a few years I ran a jerry-rigged, DIY air conditioner filter in my car made out of a sheet of 3M’s Filtrete material. You would not believe how dirty it got after just a month of urban driving, and just how fine the particulates it picks up are. Just rubbing your fingers against a darkened area will rub very fine soot and dust onto them.
On the left, a fresh sheet of 3M Filtrete – used as a DIY car air-conditioner filter. On the right, the same sheet material with a month’s worth of Metro Manila’s finest particulates trapped in it.
In return for all of these hard truths as a Filipino bicycle commuter, there is hope.
ON A BICYCLE, YOU EASE ROAD CONGESTION
No matter how truly small and space-efficient my car is, at least by today’s standards, it’s still designed to accommodate five people and a bit of grocery shopping. (Or two people and a boatload of boxes, as that’s just what a Honda Jazz can do – really well, I might add.) The many times I drive it all by myself, it can be a waste of road space. Granted, it’s half the space hog a typical SUV is, but I bet you could fit at least six of my Dahon Vitesse bike, unfolded, fitted with panniers, in the same amount of space.
At least six of my pannier-fitted Dahon Vitesse will fit in the same space my GD1 Honda Jazz occupies.
And let’s not get into close-quarters maneuvering. My car was reputed to have a gloriously tight and small turning circle of around 10 meters. Impressive for low-speed maneuvers, and shoehorning into a tight parallel parking slot nobody else will dare want, but also nowhere close to what a small-wheeled bike can do in an urban gridlock.
ON A BICYCLE, THE ROAD IS YOUR GYM
Local news presenter and anchorman Paolo Abrera, of the departed sports show “GamePlan,” has embraced the very subject matter he used to report on as an athlete. Since then he has had his own half-hour show on ANC called “Green Living,” showcasing tips and ventures on the eponymous subject matter.
Not many people may be aware, however, that Mr. Abrera lives out both his reportage subjects as a bike commuter. I had read somewhere that due to a busy schedule, he usually doesn’t have time for gym, so his bike commute from Parañaque to Quezon City – and vice-versa – nicely fills in as an efficient use of his time, striking two birds with one stone.
Local anchorman Paolo Abrera, best known for “GamePlan” and current host of “Green Living.” Yep, he’s a bike commuter.
Well, if he can do it, so can you. And before you say that you don’t have the energy to pedal on city streets, one great paradox of the human body is that the more exercise you engage in, the more energy you gradually have.
ON A BICYCLE, YOU LET MOTHER NATURE WIN
Since I got my Giant TCX SLR 2 cyclocross bike in May 2014, I’ve saved 370 kg of CO2 over seven months and 2779 km of riding.
To me this is the least interesting reason to ride a bike and commute with one, simply because it’s the first thing that pops into most people’s minds so often that it’s become a bit of a cliche. As an amateur racing driver, I am not exactly a tree-hugging environmentalist saint.
That said, there’s something remarkable about a mode of transportation that can get you around at 18 km/h average speed without a single puff of hydrocarbon emissions…well, other than the methane in farts, I suppose.
ON A BICYCLE, YOU SAVE QUITE A BIT OF MONEY
I am lucky enough to have been able to drive since college, and I’ve been paying for maintenance and fuel from an early age. It can be a little appalling how much of your money goes into the cost of fuel, insurance, maintenance, parking and toll fees – the latter, a fact of life for people from the south of Metro Manila. Let’s not get started with the other, usually unmonetized costs: time, congestion, and a low average speed of travel…especially on Saturdays.
A bicycle does away with almost all of that. Your fuel is the cost of food and water. Your insurance policy, your bike locks (and I hope you have at least two different ones). The cost of maintenance: a degrease-and-lube job on the chain, cassette and chain rings – and perhaps a brand new chain every year as the links inevitably stretch out. Bicycle tires last a pretty long time when kept properly inflated.
Parking fees? WHAT parking fees? 😉
Parking? Toll fees? Do you have to pay for those? There’s only one location I know of that charges for bike parking (yes, I know right?), and even then it costs chump change.
No more long queues, no more waiting, no more pushing – no more of the victim mentality many commuters get on a daily basis. I bet you’d earn a lot of jealous stares when you break out your folding bike, unfold it, and pedal off in front of a long snaking queue up the stairs to the MRT ticket booth. And even if you don’t get jealous stares, well, you’d still have an undeniable head start.
Many folding bike riders use them in a bimodal commute (bike + public transport), but having the bike with them means that as long as they have a good route in mind, they could just as easily pedal some more of the distance if the queue for the bus, MRT or LRT is especially bad. The way I see it, Metro Manila isn’t actually all that big in terms of land area – it’s the traffic and congestion that give the illusion of taking more time to traverse the city from north to south, and/or east to west, than is actually needed.
And for those commuters out there who’ve helplessly hailed a taxi and gotten snubbed by chauffeurs – don’t you love having a mechanism of payback?
SO AGAIN, CONGRATULATIONS.
You’ve gotten over the hang-up of treating a bicycle as “only” either a children’s plaything or an expensive hobby piece.
You’ve also looked past the “poor person” notion of bike commuting, and identified it as a ridiculously smart, sensible and simple solution to the age-old question of urban mobility in a suffocated Metro Manila.
You’ve also graduated into the realization that automobiles are not kings and queens of the road – that other forms of transport, motorized or human-powered, have an equal right to be on the road – as long as they abide by its rules – and claim the space they need to travel safely.
Being a bike commuter has its downsides, but it’s got quite the slug of benefits as well.
Stay safe and ride on.
===
This post basically concludes my little “project” called TypeVertigo Style, as I have accomplished what I had originally set out to do. My thoughts go back to the middle-aged Chinese-Filipino couple I met at Junni Industries a couple weeks ago shopping for their folding bicycle(s). I wasn’t able to get their names or properly introduce myself to them, but I am grateful to them for giving me the impetus to start writing.
If you enjoyed reading my series of ramblings, and/or want to see ramble on more, please leave a comment and let me know what you think.
UFB’s Gilbert Serrano riding his road bike through a tree-lined avenue.
Sharing a great anecdote from Gilbert Serrano of the United Folding Bikers.
===
Sometimes people ask me…
“Why do you ride a bike to work? You got a car. You even have a motorbike. The company pays for your gasoline consumption. You’re not really out of shape and you’re in the pink of health.”
Is it because of the thrill of riding? The exercise i can squeeze in my schedule? Because it releases happy hormones that uplifts my spirit everyday? Because it saves Mother Earth?
Now we’re really delving into the TypeVertigo Style of bike commuting. I humbly present my eleven principles, which have served me well while pedaling in urban areas without any bike lanes at all.
As BikeRadar’s “AngryAsian” tech columnist James Huang writes, be visible, predictable and hyper-aware. Photo courtesy of AP/Sakchai Lalit
As Huang himself says, “You can’t completely control your surroundings, but you can improve your odds.” The best way of doing this is by learning to read other road users’ intentions – either by looking at the angle of their front wheels, or how their vehicles’ bodies move. Also, once you get into the mindset that drivers and other road users will not necessarily see you, you will gradually accept the need to make yourself visible to them – and act accordingly.
RIDE WITH TOTAL FOCUS – AVOID DISTRACTIONS!
The one and only time I spun out driving on a racetrack was on a practice lap. At full throttle, a car bears its weight on its rear tires, and is very stable while turning. A plastic bag worked its way loose inside the car and floated into my helmet’s field of vision…all while negotiating a right-hand turn that I would normally take at full throttle at 120 km/h safely.
In that split second, I got distracted enough that my right foot instinctively decreased pressure on the accelerator pedal. This unweighted the rear tires, and transferred weight to the front, leading to the back end letting go and the car spinning into the grass. Fortunately for me, I came out of it with no collisions or injury at all, just a bruised ego.
My 2005 GD1 Honda Jazz 1.3S on three wheels while tackling the Chicane at Batangas Racing Circuit, February 28, 2010. It takes full focus and an absence of distractions to get through the Chicane safely – or else you end up clipping the tire wall or spinning out. The same is true on your bike! Photo by Adrian Ardiente.
When operating any vehicle, distractions are bad news. Sorry music fans, but I think you gotta put away your digital audio players while riding through very busy urban streets. On a playing field where the cards are already badly stacked against bike commuters, every bit of sensory input helps – why would you not want that? The whole act of riding a bike, keeping pace with vehicular traffic, and signaling early and predictably already requires a lot of mental focus.
The same goes for people with cyclocomputers, or smartphones with fitness apps like Strava or Endomondo. Every moment you spend looking at these is one moment of accident avoidance wasted, so only take quick glances and don’t fixate on them for too long.
RIDE ON THE ROAD, NOT ON THE SIDEWALK
If I do have to use a sidewalk, I usually stop, dismount and push the bike along. Sidewalks for me are actually some of the worst places to ride a bike because you are sharing them with pedestrians, whose actions and positions can be pretty unpredictable, and they’re supposed to be the primary users of sidewalks to begin with. It also has to be said – most sidewalks here are too narrow for cyclists to share with pedestrians, anyway.
TAKE THE LANE!
When you do ride your bike on the open road, take a lane and ride inside it. This is to make sure that you are visible to other traffic. A bicycle is a vehicle, the same way a car or motorcycle are. If you can ride your bike and keep with the flow of traffic, you ARE traffic, and you belong on the road. “Keeping with the flow of traffic” sounds hard to do, but in my experience a 20” folding bike with a rider of reasonable fitness has no problem keeping pace, and can actually carry more average speed in urban areas than a car can. If you can’t keep with the flow of traffic, move to the rightmost lane, but…
DON’T RIDE ON THE GUTTER
This just gives cars and motorcycles an excuse to push you off the road or sideswipe you, and it’s also where most of the tire-puncturing dirt ends up. Counter-intuitively, it is actually safer to ride in the middle of a slow lane and hold this position. Faster traffic approaching behind you will be forced to overtake you properly on the left – an altogether safer way. Another benefit is that you can avoid the dreaded “door zone” – that half-meter of space where a cyclist could be caught out by the opening door of a parked car.
The only times I actually ride gutters are
to filter through when other cars are stopped, and/or
I am making a right turn while the proper traffic lane is blocked by a stopped vehicle.
More on this below.
IN GENERAL – RIDE YOUR BIKE THE SAME WAY YOU WOULD DRIVE A CAR
This is my fundamental guiding principle in bike commuting. This means stopping when the traffic light turns red, and crossing or turning only when the traffic light turns green. This means slowing down, stopping, and looking both ways before crossing or turning at an intersection. This means a ban on riding against the flow of traffic, such as the wrong way along one-way streets. This means relinquishing the left lane for faster vehicles, and yielding to pedestrians and other traffic at an intersection. In other words, it means being a responsible road user.
So you ask, “Why the hell am I on a bike if I’m going to ride it the same way as I would a car?” Apart from giving other people a good image on behalf of other bike commuters, and keeping in proper flow with other vehicular traffic, the answer is in the next principle.
ANTICIPATE 10-15 SECONDS AHEAD, AND BE PREDICTABLE
All the lines and lane markings on the streets are painted on there because they’re an effort to tame the beast that is vehicular traffic and make it predictable and easier to manage. Simply following and making use of this existing framework already goes a long way into making you predictable to other road users.
Conversely, you as a bike commuter should get into the habit of looking around and behind, reading other road users’ actions and predicting how they could possibly behave in the next moments. Remember situational awareness? It’s a very important concept in operating any sort of vehicle. A good prediction margin is anywhere from ten to fifteen seconds, maintaining enough space from vehicles in front for braking or obstacle avoidance.
One benefit of correct saddle height on a commuter bicycle is that it gives you a very high line of sight compared to most cars.You are better able to see if the next couple of vehicles in front are accelerating, turning, changing lane or decelerating – either by looking at the angle of their front wheels, or how their bodies move. This improves your situational awareness and allows you to act and react accordingly.
BE CONFIDENT AND CONSIDERATE
This feeds into making use of signals. Any time you have to change lanes, evade obstacles, make a turn, or come slowing down to a stop, signal your intentions as early as possible – even if there’s no one behind you. Whenever it is safe to do so, signal!
Signals are most effective in informing road users from behind if you do them early and confidently. Outstretch your arm when you signal and point to the direction you are going, either left or right. When slowing down or anticipating a stop, lower your arm around 45 degrees to the side and perform a pushing motion towards the rear.
Alternatively, you can signal a stop by raising your arm to the side, raising your hand to eye level, and making a fist – just like how soldiers do.
All of this signaling requires, of course, that you are able to control your bicycle with only one hand on the handlebars. Practice this before setting off on a bike commute.
In the absence of brake lights and turn signal lights, confidently done hand signals may feel like inadequate substitutes, but they go a surprisingly long way toward saving your skin on a bike commute, in my experience. Many drivers quietly appreciate the effort a bike commuter puts into early signaling because it decreases their mental workload and guesswork, reducing nasty surprises.
USE YOUR BELL OR RAISE YOUR VOICE WHEN NECESSARY
If you are in a situation where you are compromised because a car driver did not see you, don’t hesitate to use your bell or raise your voice. Riding in busy districts, I find my bell a little inadequate – a yell of “Bike on your left!” or “Bike on your right!” is more effective. This serves two things: it calls attention, and it gives the driver an idea of where you are in relation to his/her vehicle. I find the bell more effective in quieter areas with a lower density of vehicles, where it’s primarily jaywalking pedestrians you have to worry about.
RIDE YOUR BIKE AS STRAIGHT AND AS WOBBLE-FREE AS POSSIBLE
In a previous post, I shared a saddle-height adjustment and starting technique that would virtually eliminate wobbling from a start. For predictability’s sake, I would also recommend riding at a fast enough speed that wobbling becomes impossible. This isn’t even that high – around 10 km/h is enough, equivalent to an easy spin on the cranks. Now that your legs are moving straight up and down, instead of splayed to the side while bent, you stand a better chance of keeping your bike running straight and wobble-free. Remember that the faster a bike is ridden, the more upright it wants to stay. Riding your bike straight and wobble-free exudes confidence in what you are doing, and in turn, instills confidence in other road users that they can trust you.
AVOID FILTERING THROUGH AND IN BETWEEN LANES AND CARS, UNLESS…
This is a pet peeve of car drivers, and as a driver myself I know exactly why. When driving a car or riding a bike on the road, the safest position to be is the center of the lane behind another vehicle – with enough of a gap for braking. Conversely, the most dangerous position is immediately beside another vehicle. Surrounded by a metal and glass cage, car drivers simply don’t enjoy great visibility on their sides of their vehicles – especially on the farther right side, where the dreaded “right hook” collision can happen. This is why filtering through and in between cars in motion is normally not a wise idea.
The best time to make use of a bicycle’s narrow dimensions to weave through and in between lanes and cars is while they are stopped, are stopping, or queued up. You are effectively limiting the number of things that can go wrong by waiting for cars to stop before making your move. In this situation, all you will have to worry about are car doors opening, which can still hurt on impact, so care should still be taken.
The moment you see cars begin to move off while you are “caught” filtering in between them, you should pull into a lane behind a car, stay in the middle, and keep pace with the car in front. Don’t forget to signal your lane change. This is the safer way of navigating through start-stop traffic. See below for a good example from a London cyclist.
In almost every other situation, you are better off performing an actual overtaking maneuver – signaling, looking, changing to the left lane and powering out.
===
So there you have it, the eleven principles of bicycle commuting, TypeVertigo Style. All it boils down to is a style of riding that goes with the flow of traffic, while anticipating risks early, and being as defensive, predictable and visible as possible at the same time.
===
Don’t agree with me? Take what works for you, remove what doesn’t. It’s that simple. That’s essentially what I did, anyway.
In the next installment, we’ll talk about tweaks to further refine your bike commuting style. Cheers, and happy riding.


