If you like working on your bike, by now you should be used to turning and tightening bolts with a hex key or Allen wrench. Have you ever wondered that perhaps you’ve turned a bolt too tightly though?
WHAT IS TORQUE?
Most bolts on a bicycle actually have a torque specification. If you don’t remember your basic physics, torque is a measure of rotational force applied to an object along an arm of a given length. Torque is usually expressed in newton-meters (Nm) in the metric system, or pounds-feet (lb-ft) in Imperial measurement. In mechanics’ case, this arm is usually a wrench of some sort.
TORQUE SPECIFICATIONS
Normally you can turn a bolt in by hand until its head becomes flush with (and snugs up against) the surface you’re screwing it into. Once finger-tight, further tightening happens with a wrench, where you apply more and more torque to the bolt. As this happens, the tension also builds up along the length of the bolt you’re tightening, due to the interaction of the threads of the bolt and the receiving object. Exceeding the torque specification for that bolt can mean breaking it clean in half, as the material gives out under the tension. These broken bolts are quite hard to extract.
The seatpost clamp plate and rack adapter on my TCX SLR 2. Both these parts are holding up the bike’s carbon fiber seatpost, so the maximum torque value is clearly engraved on both.
For the most part, metal parts are quite tolerant of a little excess torque. Torque specifications become really important, however, when you’re dealing with carbon fiber parts. Carbon fiber is a wonderful material, but one thing it’s not strong against is crushing force. If, for example, you have a carbon fiber seatpost and exceed the torque spec on its seatpost clamp, you will almost certainly damage the seatpost. Proper torque is also very important for the parts of a folding bike’s hinge and latch mechanisms, even though they’re made of metal.
TORQUE WRENCH TYPES
The dangers of applying excess torque are why a torque wrench is a worthwhile investment for serious mechanics. There are two general types.
A beam-type torque wrench being used to check a micrometer-type torque wrench. Photo courtesy of Park Tools.
A beam-type torque wrench is a socket wrench with a graduated scale, which you use to read the deflection of a freestanding secondary beam. That beam’s deflection off the main wrench arm is the applied torque. Beam-type torque wrenches are simpler and cheaper, and don’t need any maintenance, but require you to keep an eye on the scale. They’re best used for high-torque applications, such as crank arms and lock rings for cassettes or Centerlock brake rotors. These parts see torque loads in the 35-55 Nm range.
A micrometer-type torque wrench is different. Like its namesake, the end of the arm has a rotating collar used for measurement. On a micrometer caliper, this widens or narrows the caliper arms; on a micrometer-type torque wrench, it dials in the desired torque value. Once this value is reached, a clutch mechanism will release and give you both the characteristic “click” sound and slight deflection of the arm. Micrometer-type torque wrenches are more suited for the low-torque applications of most other bolts on a bicycle, but they do need periodic recalibration – and proper storage to reduce the need for recalibration.
Ritchey’s Multi-TorqKey is an example of a torque key. The two wrenches are preset to 4 and 5 Nm. Photo courtesy of BikeRadar.com
A sub-type of micrometer-type torque wrenches is the torque key. These are simpler devices which retain the clicking clutch mechanism, but ditch the adjustability. They are, in essence, made to stop at just one preset torque value, usually the most common 4 or 5 Nm – although Park Tool’s newly relased ATD-1 adjustable torque driver has five fixed torque values you can select.
Bike Hand’s torque wrench comes in a blow-molded black plastic box, made to house the wrench itself and all its bits. A metal double-hinge clasp keeps it shut.
The selection of bits should guarantee that it will work with almost any bolt on your bike. On my Vitesse, 95% of its bolts can be worked on with a 5mm hex key. The larger size hex key bits are for use on kickstand mounting bolts (8mm) and freehub bodies (10mm). The 5mm long hex key bit is particularly useful for tightening the clamp band bolts on my TCX SLR 2‘s STI levers, which are slightly obscured by their brake hoods.
I like that all the bits themselves have a knurled collar around them. This enables you to turn loose bolts in by hand until finger-tight, before bringing in the torque wrench to tighten to correct torque. You press in the button on the head of the torque wrench to fit the bits onto the 1/4″ square drive socket, where they will stay on very securely.
The torque wrench’s scale for set torque, going all the way to 24 Nm. Here it’s set to just under 2 Nm for proper storage and to maintain its factory calibration.
Turning the collar sets the torque, displayed by a moving red column along a vertical graduated scale. This lets you use Bike Hand’s torque wrench on low torque applications such as stem and seatpost bolts, as well as higher torque uses, such as the 15-18 Nm needed to tighten the TCX SLR 2’s saddle clamp.
I find that for torque loads of less than 4 Nm, extra vigilance is needed as the clutch mechanism clicks very softly and the deflection isn’t very noticeable. At 5 Nm and up, the clutch mechanism works much better and more noticeably.
For more instruction on how to properly use a torque wrench, the boys of GCN have a video on it below.
VERDICT
I’ve had this torque wrench for quite a while now, and it’s a reliable tool to have, especially while working on the TCX SLR 2’s seatpost and stem bolts where setting correct bolt torque is critical. At PhP1,800 to PhP2,000, it’s not exactly cheap, but it’s one important tool to have in your arsenal if you’re serious about wrenching on your own bikes.
Most bicycles have a conical cluster of gears hanging off the hub of the rear wheel. Despite external appearances, though, they’re not all the same.
In fact, it is this rear gear cluster that makes up the heart of a bicycle’s derailleur-based drivetrain. The cluster of cogs is called either a “freewheel” or a “cassette.” How do you tell which is which? The major difference is in how it attaches to the rear hub.
New York-based DIY mechanic RJ the Bike Guy shows the major differences in the excellent video below.
To recap:
A freewheel is a self-contained unit of the cogs and ratchet mechanism that screws onto a threaded rear hub.
Freewheels make up the heart of the drivetrain of older and/or more affordable bikes that have 5, 6 or 7 cogs, or even single-speed bikes.
A cassette is a simple collection of cogs that slides into a splined rear hub, retained by a lock ring. The ratchet mechanism is inside the rear hub itself, in a part called the freehub body.
Bicycles with derailleur drivetrains with 7 to 11 cogs on the rear wheel make use of cassettes and freehub bodies.
When was the last time you changed out your bike’s cables, lubed your chain, or checked the thickness of the brake pads? If you ride your bikes often, chances are you’ll want to keep tabs on their maintenance.
Many people have smartphones these days, and “there’s an app for that” is a popular reply for many potential problems. As it turns out, it also applies for bicycle maintenance. Feedback Sports, a company famous for its repair workstands and bicycle tools, now has an eponymous, free app that lets you focus on just that.
REQUIREMENTS
Operating system: Android 4.0 and up; iOS 7.0 and up
Clicking on the (i) opens the Bike Profile screen with your input details.
INITIAL SETUP AND USE
You start by making a “profile page” for each of your bikes. The profile contains your bike’s name, make, model and serial number; purchase details; fit specifications; stats such as distance run and weight; and a portrait (vertically oriented) photo of the bike.
If you have multiple bikes you can see all of their profile pages in the My Bikes tab.You can also switch between your bikes on the home screen by swiping left and right.
Once you have a profile page for your bike, you can now add components in the Component List screen. These fall under one of six categories:
Frame, Fork and Headset
Drivetrain
Handlebar, Saddle and Seatpost
Wheels and Tires
Brakes
Accessories
Under each of these categories, there are several more specific sub-categories of parts; e.g. the “Wheels and Tires” category has hubs, rims, spokes, tires and tubes. Each item will have the date added, as well as optional details like weight, cost, and extra details in the description.
The initial entry of all these bike components into the app is admittedly a bit of a tedious grind, especially since modern bikes have a bevy of them. If you’re a completionist, a typical bike will have twenty to thirty entries in the Component List screen alone. The good news is you have to do this only once. The only time you’ll have to revisit this screen for editing is if you add new components and/or remove old one when they get replaced.
Feedback Sports also allows you to export the Component List in the app as a CSV file for easy editing in a spreadsheet program, such as Microsoft Excel or LibreOffice Calc.
THE APP AS MAINTENANCE MINDER
Once you’ve input the details of your bike, you can now make use of the Maintain screen to input maintenance records. As with the Component List screen, Feedback Sports classifies maintenance records under the six main component categories and their sub-categories. From there, you enter the maintenance date, a top-level description of the maintenance done to that particular part, and a more detailed description if you so choose.
Editing an existing maintenance record. Funny enough, you can’t delete any of them.
Before you save each new maintenance record, you’re given the option to set a date-based maintenance reminder for that particular item. This will show up on the Reminders screen as a checklist organized by date. This is helpful for such periodic maintenance jobs such as checking chain wear or overhauling your wheel hubs.
The Reminders tab with all the reminders you’ve set up per bike. A reminder will disappear when you tap it as “checked.” It will disappear after you leave this screen.
Once you’ve saved enough maintenance records, they show up on the Maintenance Records screen. From here, you can see at a glance just how long you’ve been riding with old, corroded cables and a neglected chain. You can also filter through the records to search for particular maintenance jobs. As with the Components list, you can also export your maintenance history as a CSV file.
The Maintenance Records screen.
FINAL THOUGHTS
My complaints are few. There doesn’t seem to be a way of removing a maintenance record you’ve entered as a test value, or by mistake – any maintenance records you input and save seem permanent. Also, this app isn’t smart enough to associate ridden distances (or “odometer readings” if you prefer) to wear components such as chains – not by itself, anyway. If that’s how you roll, you’ll have to do that in a roundabout way, via the description field provided for each component.
Finally, while the app allows exporting of data as standard CSV files, it doesn’t seem to allow importing them into the app. Not everybody has the patience for the tedium of such data entry using a smartphone.
Overall, I like the Feedback Sports app. It’s not flashy and its no-frills approach may be a little boring, but over a few months of use it’s been very helpful in keeping track of my bikes’ consumables. It’s the not-so-sexy stuff, like brake and shift cables, brake pads and the chain, that contribute the most to how your bike actually feels to ride, so keeping an eye on their condition pays off in the end for people who ride their bikes often. It’s a good tool to use for the maintenance-minded among us riders.
“Degreaser? Anong degreaser? Walang ganyan sa bundok namin ma’am, sir…”
A 946mL spray bottle of Simple Green Multi-Purpose Cleaner next to a 1L bottle of PowerClean Water-base Engine Wash Degreaser. The simpler bottle is more than two times cheaper.
Technically, you could use dishwashing liquid in a pinch. Some of them advertise themselves as “grease strippers” and they do perform a fairly good job. I’ve used Simple Green Multi-Purpose Cleaner on occasion as well, but it’s not always available, and it can be a bit pricey at PhP175 for a 946mL spray bottle. There may be better, more dedicated solutions out there, I thought.
The orange liquid is very slightly viscous yet mostly free flowing as it comes out of the bottle; I was told by the PowerClean shop clerk that this can still be diluted if necessary. It’s mildly fragrant, too. Using it straight from the bottle in my Finish Line chain cleaner, I noticed how effective it was in removing the gunk from my chain and leaving it sparkling after 90 crank rotations. It works a little better than the lighter-weight, less viscous Simple Green in this respect, and it certainly sticks to the chain cleaner’s brush bristles better.
Simon Richardson shown here using an old paintbrush to “paint” degreaser onto a cassette. Photo is a screengrab from GCN’s “30 Minute Bike Wash” video – click on the photo to watch!Here, Simon paints degreaser on SRAM Red chainrings. Photo is a screengrab from GCN’s “30 Minute Bike Wash” video – click on the photo to watch!
Following the advice of others on bike washing upon my further reading, I got a cheap 1″-wide paintbrush and used it to “paint” the degreaser onto my drivetrain parts – specifically the cassette and chainrings. After doing so, the instructions tell you to let the stuff sit on the objects being cleaned for a few minutes…which you can spend drinking your cup of morning coffee and/or gulping some breakfast.
When I came back after twenty minutes, I saw the cassette now sparkling clean, save for a few isolated greasy spots. A subsequent light coating of the degreaser and some light persuasion with the paintbrush pushed the remaining spots away. My chainrings are black, so improvements aren’t so obvious, but they came out just as clean, too.
With minimal work, PowerClean’s degreaser sure did a number on my cassette. Imagine what it can do to a car’s dirty engine bay?This is the shiniest used chain I’ve seen in a while. The chainring teeth got pretty clean from the degreaser, too.
The degreaser effectively did the grunt work of cleaning up the drivetrain, which means you can ultimately use less of the stuff, expend less effort scrubbing, and save some money.
A caveat: Once done, you will need to make sure that you thoroughly clean it off the chain by using a hose with low water pressure and a rag. Any degreaser left over in the chain links will destroy any chain lube you apply inside the roller pins of the chain.
VERDICT: YEA OR NAY?
PowerClean sells their water-based Engine Wash Degreaser through its various branches (quite a number of them within Metro Manila) in either a one-liter bottle for PhP75, or a one-gallon (3.8L) bottle for PhP220. That’s a pretty good deal, and a one-liter bottle exclusively used for cleaning bikes should last a pretty long time. It helps the patriotic conscience no end that this, like the rest of PowerClean’s stuff, is made right here in the Philippines, too. Add to that the purported water solubility and green credentials of the product, and it’s a win-win situation in my opinion.
For road cyclists, there are few tactile delights as quick to transform and rejuvenate your bike as freshly wrapped handlebar tape. After all, it is one of the three primary contact points you have on a bike, and it is also arguably the one through which you communicate the most with the road.
HAVE YOU GOT OPTIONS
Bar tape comes in many different forms. Traditionalists and the truly old-school swear by classic cotton tape, with a layer of grip-enhancing twine wound on top and finished off by a protective brushing of glossy shellac. Nowadays though, many bar tapes are made up of either cork or EVA foam (for shock absorption), leather, or various rubbery materials that become tacky when wet. Some people even use butyl inner tubes as bar tape.
Common to all of them is that they will wear out with use, becoming knackered and tattered with time, so they do need to be replaced every now and then. (This is especially true for white bar tape!) It is usual practice to change bar tape at the same time you replace your brake and shift cables and cable housings, since these are hidden under the bar tape.
Selle Italia Smootape bar tape in whiteMine is the “Granfondo” variant“Smootape” is so named due to how it supposedly avoids the lumps that form on wrapping and overlapping of the tape on itself
FRESH CABLES, FRESH BAR TAPE
It just so happens that I recently sent my Giant TCX SLR 2 to LifeCycle for brake cable replacement, a maintenance job I don’t yet have the tools for. While I was there, I bought fresh bar tape for me to install at home. It is a simple enough job, requiring only a pair of scissors and some electrical tape.
The finishing strips in this case are basically long stickers, not electrical tape
The box of bar tape itself usually includes everything else that you’ll need:
Two rolls of handlebar tape (obviously)
Two extra strips of handlebar tape
Bar end plugs
Finishing strips – these can either be tape or stickers
WRAP THAT BAR!
Now, there are a great many ways of wrapping bar tape, and each one has its fans. The method I’ll share today is just one of them, and notably it doesn’t make use of the two extra strips of bar tape that come in the box. These are normally used to cover up the clamp band on the brifters. As a general idea, I will be wrapping the tape from the outside in, then transitioning from back to front as I move to the bar tops.
We begin by first folding back the brifters’ brake hoods and stripping the old bar tape off the handlebars. Doing this exposes the cables and cable housings; make sure that they are securely fastened to the handlebar with electrical tape. The old bar tape may leave some adhesive residue on the bar itself; you can clean this off with some alcohol.
My bars with the old bar tapeBrake hoods pulled backUndoing the electrical tape at the endUnraveling from the bar topsAs more of the old tape unravels the brifter clamp band gets exposedOld tape offBare aluminum alloy handlebarA quick inspection of the engraved markings shows that this drop bar is made by Satori for Giant as an OE item. Width is 400mm.
I start wrapping at the bottom edge of the very end of the drops. Place the tape so that half of it is on the bar, and half of it hangs in the air. Then, wrap one full turn around this initial bit of tape, toward the outside in, while pulling and keeping tension on the tape. Keeping this tension is important; this is primarily what keeps the bar tape wound around the handlebars, with the underside adhesive performing only a secondary role.
The underside of the bar tape has either conventional adhesive or a tacky rubbery layer; this is an example of the latter and it’s usually better if you want to reuse or re-wrap the bar tapeBeginning the wrapThe initial full turn of half-overhanging bar tapeWrapping at an angle or bias upward from the end of the barIMPORTANT: Keep tension applied on the tape as you wrap
After this initial turn, I start to wrap diagonally along the drops, going up toward the brifter, while overlapping some of the tape upon itself. You can use the adhesive strip on the underside of the bar tape as a sort of guide to determine how much overlap you want. The amount of overlap will tend to vary as you go along, especially around curved portions of the bar, where you want smaller overlap on the inside curves. Remember to keep that tape under tension!
With half the bar tape’s width remaining from the brifter clamp band it’s time to think about the figure-eight
Approaching half the width of the tape to the clamp band of the brifters is when we perform the figure-eight bend that will cover up this area in lieu of the two bar tape strips. The trick to this method is to look at the brifter from the side as a fixed point of reference.
First, feed the tape along the underside.
Then pull the tape upward, wrapping once around the same plane as the brifter hoods.
As you pull the tape downward, wrap it once around the back underside of the brifter lever, then wrap around the front. This is your chance to cover up any exposed clamp band or bar.
Wrap once around the same plane as the brifter hoods again, as in #2. This is also the final chance to cover up any exposed clamp band or bar.
If you did the figure-eight bend correctly, after clearing and wrapping the bar tape around the brifters, you should now be continuing your wrap from back to front.
Remember to keep that tape under tension!
To begin the figure-eight, wrap behind the bar to cover the clamp band, then go over the brifter hood bodyNext, go back under the bar to cover the brifter clamp band a second time, then wind the tape forward to cover the bare bar underneath the brake leversFinally, wind the tape to the back again and pull upward on the outside to continue the wrap and finish the figure-eight. Done correctly, this should mean you are now wrapping back to frontFor the bendy bits of the bar, tighten the overlap on the inside of the curves, but maintain enough overlap on the outside to keep the bar covered up
After varying the overlap for any remaining bends, you should be thinking about how to finish off the bar tape wrap as you approach the stem. You do this by scribing or lightly scoring the bar tape with your scissors at an angle, so that the end of the wrapped tape lines up straight. Once satisfied, you can cut the excess tape off. Remember to keep that tape under tension!
Scoring the final bit of bar tape in preparation for the cut – do this at an angle and it should leave you with a straight finish
At this point you should have your roll of electrical tape ready. Wrap the final bit of bar tape, then stick the electrical tape directly on top of it, some way behind the very end of the bar tape. Do not stick the electrical tape to the bar itself as this just makes the finish sloppy and the adhesion uneven. The electrical tape is nowhere near as elastic as the bar tape, so ideally it should be put under just a little tension, relying mainly on the adhesive to keep it in place – wrapped around itself. Wrap the roll of electrical tape around the bar tape three or four times, then cut so that it terminates on the underside of the bar, making it invisible.
Terminating the bar tapeStick your electrical tape a short distance before the bar tape terminates, then start wrappingThree or four turns of electrical tape should suffice. Cut the tape so that it terminates on the underside of the bar
Finally, to finish the job, roll back the brake hoods and return to the drops and the start point of the bar tape wrap. Fold the hanging bits of bar tape into the hollow of the bar. As you keep the bar tape inside the drop bar, take your bar end plug and push it in to anchor the bar tape in place.
Fold the hoods back over the brifters to ensure no amount of bar is left bareReturn to where you started to finish off the wrap jobPush all the overhanging bar tape inside the barFinally, take your bar end plug and push it into the bar to anchor and tidy up the excess bar tape
You should now have a bike that feels significantly newer and fresher – just from swapping out bar tape!
One of the defining traits of a road bike is the distinctive arcing shape of the handlebars. Ever wondered why they’re shaped the way they are?
FLAT HANDLEBARS EXPLAINED
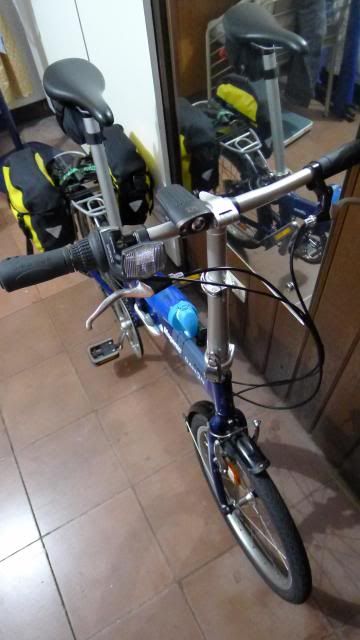
The 580mm flat handlebar on my Dahon Vitesse.
Many bicycles come with flat handlebars. This basic shape of bar comes standard on mountain bikes, BMX bikes, and most folding bikes. They typically start at a width of 580mm for folding bikes, working up to 700mm and beyond for mountain bikes. The shape of the handlebars dictates how you hold them: you hold out your arms, turn your wrists 90 degrees inward, and hold the bars to keep balance, steer, and operate the brake levers and shifters.
The hand position on a flat handlebar folding bike. Note the twist in the forearm needed to grasp the grips.
I bet you learned how to ride a bike using one with flat handlebars. While this may seem like the natural “of course that’s how it’s supposed to be” configuration, this isn’t necessarily the case, and it has a few downsides. Notice that you have to maintain a 90-degree twist in your forearm and wrist in order to hold a flat handlebar correctly. Also, you can vary where along the bar you grip, but you’re essentially holding it only one way the whole time. For short trips, this is okay, but for longer rides on the road, this can become uncomfortable and/or unnatural depending on what kind of riding you want to do.
WHY THE NAME “DROP”?
My Giant TCX SLR 2 is an example of a bike with drop handlebars.
Drop handlebars have the trademark two bends per side, one going forward and another going downward – dropping away from the center. These transform an otherwise flat metal tube into something with three dimensions. From the center of the bar where it is clamped by the stem, the length of the forward projection is called the reach, while the height of the downward projection is called the drop. The width is the same as before, but measured from one forward bend to the other. Measured this way, most drop bars are 400-480mm wide – considerably narrower than even a folding bike’s. This range of widths is meant to match up to the width of a rider’s shoulders.
Shimano 105 STI levers (brifters) on the TCX SLR 2. The black rubber hood serves as a horizontal extension of the drop handlebar where the palms can rest.
The brake levers on a drop handlebar are mounted specifically on a region at the top of the downward bend. On road bikes of old, the shift levers mounted separately on the downtube, or sometimes on the stem, or even on the ends of the handlebars. Most modern road bikes integrate the braking and shifting into one area, in order to minimize hand movement and maximize control. This is done via devices such as Shimano’s STI (“Shimano Total Integration”), SRAM’s DoubleTap, and Campagnolo’s ErgoPower. Regardless of manufacturer, all three are called “brifters,” as they are effectively an amalgam of BRake and shIFTER levers.
POSITION #1: RIDING ON THE HOODS
Riding on the “hoods” while seated. This is the default riding position on a bike with drop handlebars.
New or old, operating a road bike with drop handlebars is slightly different compared to holding a flat handlebar. The shape and control layout of a drop handlebar gives you at least three different hand positions, and each one serves a specific purpose.
First and foremost of these is riding on the top rubber covers, or “hoods,” of the brake levers. This may actually be the least intuitive or obvious position, so it deserves explanation. The hoods are designed so that your thumb and two forefingers hook and wrap around them, and this is where you spend most of your time riding on a road bike (around 80%). With your brifters set up correctly, riding on the hoods should mean you have full control over the braking and shifting of your bike using your fingertips. Notice that you raise your arms forward as before, but now you no longer have to twist them to hold on and steer the bike – and this is far more natural for your arms.
Riding on the hoods is a jack-of-all-trades position where you still sit relatively upright, but are also leaned slightly forward. It may feel unnatural in the beginning riding in this stance, but this is remedied by bending your body forward at the hips instead of at the lower back, and getting used to this position.
Riding on the hoods while standing/out of the saddle. This is a good position for climbing, and is also useful for acceleration.
Riding while seated for too long can constrict blood flow to your groin and soft tissues and lead to numbness, so standing out of the saddle is a good way of preventing and/or relieving this. From the hoods, once you stand up out of the saddle, you can ride in a heavier gear and a slightly slower cadence. This is perfect for a spurt of power while climbing or for changing up your position for comfort. Conversely, standing while riding on the hoods in a heavier gear with a faster cadence is a good position for acceleration into a sprint.
There are some disadvantages to riding in the hoods. Most noticeable is that it takes practice and patience to get used to braking from this position. This is as much a function of the shape of the hoods and brifters as it is having your hands getting used to holding them this way, and even so, the hoods don’t offer the best leverage on the brakes. I find I have to make use of three fingers for harder braking on the hoods. Not as noticeable is the risk of losing grip on the hoods when riding over rough terrain at high speed, such as in cyclocross races or the cobblestone-riddled European Classics races such as Paris-Roubaix; riding in the drops is better for this.
POSITION #2: RIDING ON THE TOPS
Riding on the “tops” – the closest you can get to emulating a flat handlebar grip on a drop handlebar. Notice how upright the rider’s posture is.
This is the traditional hand position you would normally adopt on a flat-handlebar bike. Because of the narrower width of a drop bar, your hands are usually closer together and nearer to the stem while riding this way. When riding on the tops, your hands don’t make use of the reach of the drop bar, so this is the most upright position available. Your shoulders can relax and your diaphragm has the least restriction, so you are able to breathe the freest.
Cyclists ride on the bar tops mainly to rest and regain their breath quickly. This position sees the most use on long seated climbs.
With a few exceptions, a typical modern road bike usually doesn’t have controls on the center flat portion of its drop handlebars.
You will quickly notice that riding on the tops usually means you have no access to your brakes or shifters. There are exceptions, but for the most part, riding on the tops leaves you only with steering. For this reason, this is the hand position used the least on a road bike.
You usually don’t need to use your brakes on a climb anyway, as you’re going at a slow pace while resisting the force of gravity, and any obstacles are easily avoided just by steering out of the way. Once you need to click into an easier gear, you’ll tend to go back to riding on the hoods.
By the way, standing up and riding on the tops isn’t recommended, as it tends to exaggerate any swinging movement of the bike. This may lead to a loss of stability.
POSITION #3: RIDING IN THE DROPS
Riding in the drops. As will be explained later, this is only the basic position.
Making use of the ends of the handlebars, also known as riding in the drops, is much more versatile than one would initially believe.
Let’s start with the most obvious. Just gripping at the drops while seated requires that you get long and low on the saddle. It looks racy doesn’t it? This reduces your frontal area and aerodynamic drag. This is useful when riding into a headwind or riding at high speeds.
You can bend farther forward and make your profile even lower when riding in the drops. This lowers your center of gravity, spreading more your weight along the length of the bike, and makes for a stable ride while on a downhill descent.
Not as immediately obvious is the benefit to weight distribution. In any other position, your weight is biased more to the rear of the bike. Riding in the drops spreads your weight forward across more of the bike, and automatically gives the most secure grip on the bars themselves. This aids control in so many situations: descending a mountain or hill slope, riding through rough terrain, or sprinting. All three are situations where riding on the hoods might throw your hands off the bars and result in a loss of control, especially when combined.
You also may not notice that your forefingers have the most leverage on the brake levers while riding in the drops. This aids in the modulation of your brakes from a featherlight touch to full-on maximum speed retardation.
This is how you apply maximum braking on a bike with drop handlebars: in the drops, out of the saddle, weight pushed backward. This mitigates the risk of going over the bars. More flexible riders can hang their hips totally behind the saddle.
Getting out of the saddle while riding on the drops also keeps you very secure while allowing you to play with the weight balance of the bike. The most important application of this is under emergency or maximum braking. Given enough flexibility, a rider can hold on to the drops, set the pedals level, get out of the saddle, and hang his/her buttocks or hips over the rear of the saddle to transfer weight rearward…while applying hard pressure on the front brake. This way, a rider is able to apply as much brake pressure as needed, while reducing the risk of going over the handlebars. This skill is worth practicing.
Riding in the drops, out of the saddle, rider weight as far forward as it gets. Riding this way recruits as much of a rider’s leg power as possible into acceleration – assuming the rider uses the right gears, and the surface is good.
Conversely, when grip and conditions are good, riding in the drops out of the saddle also allows you to push your weight forward so that your legs can propel the bike with the most power in a sprint. Some sprinters even hold the bar ends and forego covering their forefingers over their brake levers as they accelerate.
Holding the drops – no fingers on the brifters. This hand position is normally seen in criterium races on closed roads.
For all the versatility of riding in the drops, there are a few disadvantages to the position. First of all, your breathing becomes restricted due to being bent over the bike. This means the drops aren’t very useful on long climbs. Apart from that, it can be painful for beginners’ lower backs to hold this bent-over position for extended periods, especially if a rider isn’t very flexible to begin with and/or has not gotten used to riding in the drops yet. This can be remedied by using handlebars with a so-called “compact drop” of 125mm or so. Lastly, riding in the drops out of the saddle with your weight thrust forward can correspondingly unweight the rear wheel, to the detriment of traction. This is usually an issue when climbing on poorly surfaced roads.
One of the great things about owning a bicycle is that, as far as machines go, maintenance is fairly simple and straightforward. In general, a bicycle runs happiest and best when it is clean.
Everyone has their own way of washing their bikes, but it’s important that you do it regularly. This is especially important for mountain bikers who hit the trails, and those of us who ride in the wet. Today, I’ll show you how I do it.
Some of the tools and supplies I use. A toothbrush, a stiff-bristle scrub brush, a Finish Line chain cleaner, a garden hose and some dishwashing liquid.
TOOLS AND SUPPLIES
Degreaser or dishwashing soap
A bucket and a water dipper (tabo) of warm water
A water hose
Old toothbrushes and/or finger-sized bottle brushes
Stiff-bristled brushes
Your choice of wet or dry chain lubricant
Rags
An old wash mitt
A flat-head screwdriver (optional)
A chain cleaner (optional)
A stand or workstand (optional but highly recommended)
PREPARATION STEPS
The first thing to do is to strip the accessories from your bike – usually removable lights, mini-pump, locks, cyclocomputer and water bottles. They’ll just get in the way, and you don’t want these getting wet with soapy water because soap tends to defeat waterproofing. Soap makes water more slippery – it’s how it does its job.
My Giant TCX SLR 2 in commuter trim prior to washing.Removed: My front and rear lights, cyclocomputer, locks, mini pump, saddlebag and water bottle (I normally carry two of them).The same bike stripped of almost all its accessories. The rack-mounted reflector/auto rear light is screwed in. Removing the bottle cages, fenders and rear rack means greasing the mounting bolts when you reattach them. I have no problem leaving them on.
Another prep step unique to bikes with disc brakes is putting on plastic bags over the brake calipers and rotors, or removing the wheels. This is to minimize the chances of contaminating the rotors or brake pads with oil, either from chain lube or the oils on your skin. Contamination reduces the effectiveness of brakes and can make them noisy. You can clean out rotors with brake cleaner or isopropyl alcohol, but contaminated pads have to be replaced.
The rear caliper and rotor wrapped up.The front rotor and caliper wrapped up.
WHY WASH THE DRIVETRAIN FIRST?
Most bicycles have a chain transmitting pedaling power from the pedals and chainrings to the rear wheel via one or more cogs or sprockets. With multiple cogs, derailleurs or mechs push the chain sideways to switch between them. These “guts” of the bike are exposed to the elements and end up becoming the dirtiest bits, which is why you have to wash them first.
The chain contains lubricant or oil, which enables the pins and rollers in the links to do their job, but also attracts dirt and grit over time. The dirt acts like sandpaper, wearing away at the chain’s rollers and causing “chain stretch.” Some chain stretch over time is normal, and manufacturers recommend replacing the chain after a while. If you continue using the stretched chain, it will deform the flat teeth on the cogs and chainrings, wearing them away into sharp and pointy shark-tooth shapes that will result in skipping and loss of drive. When this happens, you have no choice but to replace the whole drivetrain – not just the chain. That’s a minor shame, considering that a typical cassette should last around three chains’ worth of wear – with the chainrings lasting much longer.
If you have a KMC Missing Link or some other removable link, you can use that to remove and reattach the chain for cleaning. In my experience though, they tend to become loose after about 10 disconnect-reconnect cycles – and if you’re not careful it’s easy to lose the Missing Link itself.
Another look at the chain cleaner. It’s made up of three rotating brushes, the center one located in the top cover to sandwich the chain. At the end are scrub plates to clean the side plates of the chain links.
These days, I prefer cleaning the chain without removing it from the bike. To do that, I use a Finish Line chain cleaner, which I bought from my Japan trip earlier this year. This useful device has a small tank for degreaser, three rotating brushes, scrub plates, and a magnet at the bottom to attract bits of worn chain.
My chain cleaner opened up to accept the dirty chain above.On the side of the chain cleaner is the fill line. Here you can see I overfilled it a little with water and dishwashing liquid – the point is to make sure the brushes are soaked in the stuff. The black plate under the handle is the magnet. Take note of how clean the solution is here.
You start by filling the chain cleaner with your preferred degreaser. For most cases, dishwashing liquid will work. If what you use is thick and viscous, you’ll want to dilute it; I make a solution of one part of my thick dishwashing liquid in three parts water. The chain cleaner will have a fill line on its side; fill up to this level.
“Tout adroit” is cycling slang for a maximum speed sprint – it’s French for “all to the right,” signifying the use of the smallest cog and largest chainring (effectively top gear). When using a chain cleaner, I do the same to move the chain as free of the wheel as possible.
Next, shift to your smallest cog and largest chainring to push the chain as far right as it will go. Hook the chain cleaner over the chain and snap it closed. Hold the chain cleaner right up to the cage of the rear derailleur, then turn the cranks backward for 60-90 rotations. (If you don’t have a chain cleaner, you can use two toothbrushes held in a pincer formation as they pinch the chain.)
Ninety crank rotations later……the solution in the chain cleaner has darkened considerably. That’s all the grit, dirt and old lube from the chain. Riding in the wet increases all that.
With a thick degreaser diluted in water, as above, you can really see the chain cleaner doing its work. The chain will slowly foam up as the degreaser is agitated by the brushes, which clean the chain along with the scrub plates. Any metallic dirt it removes from the chain, it will hold on to using its magnet. Try to hold the chain cleaner steady, as pushing it side to side (like a manual derailleur of sorts) can lead to a dropped chain.
It’s a little fuzzy but the black dotted residue in the middle is all the metallic bits of dust, grit and worn chain. The chain cleaner’s magnet holds on to them and keeps them away from the chain as it cleans, preventing their especially abrasive wear.
After 90 crank rotations, check the chain. If it’s especially dirty, it may need another round with the chain cleaner. Drain the chain cleaner, fill it up with fresh degreaser solution, then repeat until the chain is sparkling clean.
CLEANING THE CASSETTE
We now move on to the cassette. Your chain should still be in the smallest cog at this point. Break out your stiff-bristled brush, dip it into your water dipper (tabo) of soapy water, and press its bristles up against the cassette longitudinally.
Get a water dipper (tabo) and pour some dishwashing liquid into it. Foam it up with the water jet of the hose. You’ll need the stiff-bristle scrub brush too.Press the bristles of your soaped-up scrub brush into the cassette and turn the cranks forward. Make sure you keep your fingers clear of the spokes. This quickly cleans the cassette.
With your other hand, turn the cranks forward– while being careful not to snag your brush hand’s fingers or knuckles on the rotating spokes. This will spin the cassette, and with every rotation the stiff-bristled brush will scrub the cogs and the gaps in between. If you backpedal on the crank like you did with the chain cleaner, the cassette won’t spin because of the drag from the brush.
Shift to the other end of the cassette to get the chain out of the way and clean the smallest cogs.
Continue doing this, dipping into the soapy water every so often. Repeat this process after shifting to the largest cog, so that you can scrub the smallest cog of its dirt too. Your cassette will be clean before you know it.
Clean cassette!
SCRUBBING THEM CHAINRINGS
Once done with the cassette, shift to a middle cog to prepare for chainring and crankset cleaning. Cleaning the chainrings is a simpler affair; all you really have to do is target the teeth and the shift ramps and pins behind the middle and large chainrings.
Scrubbing away at the big chainring.Make sure you hit the underside of the chainrings as these contain the shifting ramps and pins. Keeping these clean improves your bike’s front shifting.
To ensure a thorough clean, shift up and down the chainrings as necessary and scrub away.
Here the chain is on the small ring, so we can clean out the teeth of the big ring.More cleaning of the shifting ramps and pins. Safety goggles might be a good idea at this point.
Clean your cranks and pedals at this point too. If you have clipless pedals on your bike, make sure you target the retention mechanism and springs.
Shimano’s Saint PD-MX80 pedals have screwed-in traction pins to bite into your shoes’ soles in case of mud. They can get muck gummed up into their screw threads, so they benefit from scrubbing too.
DON’T FORGET YOUR DERAILLEURS
Set aside the big brush for now, and get your toothbrush and other fine brushes. Derailleurs are intricate little things and need a little more dexterity to clean.
The most important bits to clean are the pivot joints where the derailleurs move when shifting. These parts are usually lubricated, which means they can also attract dirt and give you lousy shifting when left alone for too long.
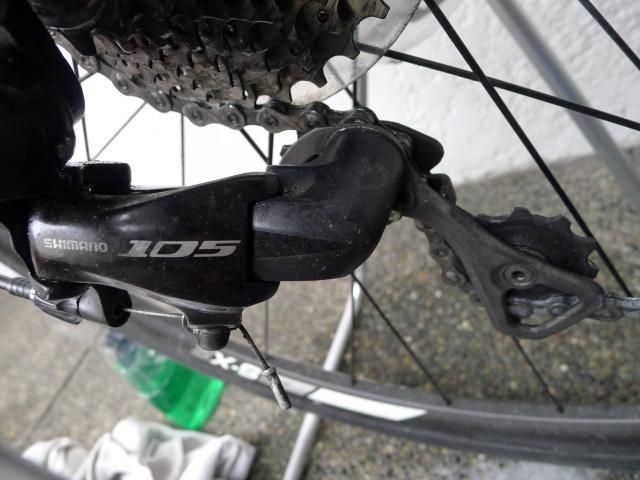
A fairly dirty rear Shimano 105 5700 rear derailleur that’s seen a number of wet rides.Job 1 is cleaning the pivots. You need a toothbrush to get at them.These are the pivots on the front derailleur. Again, a toothbrush is your friend.
The next bit to clean is the cage, which is pretty much 70% of your front derailleur. You can imagine it can get pretty grotty having to accept and push a dirty chain around. Keeping this clean means one less place for your chain to pick up dirt.
Clean that cage!Even the lower portion of the front derailleur’s cage has to be cleaned too. Scrub at those side plates.
When you clean the rear derailleur, the main difference is that the little jockey wheels its cage contains can collect a lot of dirt. Scrub the pivots and cage as before, then take a toothbrush or a flat-head screwdriver and hold it next to the jockey wheels as you turn the cranks backward. This cleans all the surface grime.
The rear derailleur cage. The top jockey wheel (hidden here) is the guide pulley, while the bottom one is the tension pulley.Holding a toothbrush to the jockey wheels and turning the cranks backward cleans off their surface grime.
Lastly, don’t forget the springs of the derailleurs themselves.
Just below the bristles is the knuckle spring of the rear derailleur. It’s worth keeping this clean too. The front derailleur has a similar spring.
CLEANING THE REST OF THE BIKE
Now that your drivetrain is sparkling clean, you’re halfway done with the job.
The hosedown. Avoid high pressure – that’ll cause you headaches later on
Get the hose and set it to a gentle spray of water to rinse off the dirt on the surfaces of the bike. Avoid using a high-pressure jet of water, as the force can knock all the grease out of hubs, headsets and other parts that you want to keep running smoothly.
Take some dishwashing liquid, squirt it into a bucket, and shoot a jet of water into it……to foam it upI use an old chenille wash mitt for general cleaning of the bike. This is easily found in the automotive section of hardware stores.
Once the bike is rinsed, it’s time to bring out the bucket of soapy water and the wash mitt. You want to work with gravity here, so begin washing from the front and top of the bike, then work your way downward and backward. This means washing the handlebars, stem or handlepost, saddle and seatpost first.
The saddle needs some love, tooCleaning the handlebars, brake hoods and STI levers. If you have white bar tape, you’ll need to go over it with a scrub brush and some elbow grease to get it clean again.
If you have a road bike with white bar tape, you’ll know that it gets dirty if you even just look at it the wrong way. Take a second clean scrub brush, apply some soapy water, then scrub away. With a little elbow grease, the bar tape will go most of the way back to its bright white (although it’ll never be truly as bright as it was originally).
WASH = INSPECTION
While washing, inspect the frame tubes for any discoloration, cracks or damage. This is the best time to do so since you’re up close and personal with the bike, and is all the more important if you have carbon fiber or composite parts like forks and seatposts – or, indeed, a carbon fiber frame.
The TCX SLR 2 has a carbon fiber fork – inspect it thoroughly every washTwo fork blades = two inspection pointsEven the TCX SLR 2’s beefy aluminum downtube can suffer cracking, so make sure you inspect while washing.
Do the same for your wheels and tires. Check for rips, tears and irregular wear as you wash. Check the spokes by hand for evenness of tension, and identify any loose spokes. If you have rim brakes, make sure you wash and clean the brake tracks on your wheels, and check for any pitting or signs that the wheel may be weakened at the brake track. If you have disc brakes, check the rotors for discoloration.
Clean and inspect the condition of your wheels and tires. Especially important if you run rim brakesClean the hub shells while you’re at it, too
Some of the dirtiest parts of the frame are the downtube, bottom bracket shell, cable guide, seat stays and chainstays. Make sure you reach them with at least one pass of soapy water.
Make gravity work for you by lathering up the junction of the seat tube and seat stays and squeezing the wash mitt. This sends foamy water down the tubes to push dirt away.Back when I didn’t have fenders, the underside of the downtube got filthy very quickly in the wetChainstays are dirt magnets, especially when you get closer to their junction with the seat tube and bottom bracket shellAn often overlooked areaA lot of bikes have cable guides on the underside of their bottom bracket shells. Leave this dirty and your braking and shifting can suffer. The TCX SLR 2 doesn’t have this problem as its cables are internally routed and there’s no cable guide down there
After lathering up the bike, hose away with a gentle spray of water and dry off with your rags.
Rinse off the soap and foam with a gentle spray from the hose.Wipe down with a rag.
Now you can put your accessories back onto your sparkling clean bike! If you’re so inclined, you could also wax the frame for more luster, as dishwashing liquid tends to strip any wax.
Now that’s a clean bike
THE HOME STRETCH: LUBRICATING THE CHAIN
It’s been a long post but the last thing you do at the end of a bike wash is to lubricate the chain. Break out your chain lube. There are dry lubes for general riding, and wet lubes for extra tenacity in wet conditions. Bear in mind that wet lubes also attract more dirt, more easily.
General riding calls for dry lubes. Not all of them are made the same, though. Zefal Bike Dry Lube, for example, is a very runny lightweight oil, while Finish Line Teflon Dry Lube is a slightly more viscous milky-white fluid that sticks to a chain better.I use Tri-Flow Synthetic Soy Lube as a wet chain lube. It comes with a straw that comes in handy when applying to derailleur pivots.
Chain lube is best applied to each roller pin one at a time, and only on the inside of the chain – the side facing the teeth of the cogs, chainrings and jockey wheels. Putting it anywhere else on a chain is a waste of lube, and just increases the risk of splattering the lube on places on a bike where you don’t want it, such as rims’ braking tracks or disc brake rotors.
The way I do it is I pick out a fixed place on the chain where I can start and end my lube job. KMC Missing Links are ideal for this, since they are distinct from all other links on a chain.
Applying chain lube to a KMC Missing Link. As you can see, they’re shaped differently to the other links on the chain, so they make perfect fixed markers for where to start and end lubing.
You don’t really need all that much lube – any more just attracts more dirt quickly. All you want is a thin coat. Once all pins have been lubed, take a rag and wrap it around the chain while you turn the cranks backward. This removes excess lube.
Wipe off excess lube with a rag as you turn the cranks backward.
While you have your bottle of chain lube open, treat your derailleurs to fresh lube on the pivots and jockey wheels. This ensures they keep working properly. Perform a few test shifts to work the lube into the pivots, cassette and chainrings.
Put a drop of lube on the jockey wheels……and derailleur pivots.Just a drop is enough, so wipe off the excess here too.
After all that, treat yourself to a shakedown ride. Congratulations!
I like wrenching on my own bikes. Often, the challenge with working on a bicycle is actually holding the thing upright while you do your thing.
A Park Tool PCS-10 clamping workstand for bicycles. The clamp head is holding up the bike on its seatpost. Image courtesy of BikeRadar.com.
I used to prop the bicycle with one of my arms or hands while I had my Allen wrench in the other…not exactly ideal. This is why a workstand is so helpful. These devices clamp onto the seat tube or top tube and suspend the bike in mid-air, freeing both your hands for the actual dirty work. Unfortunately, most clamping workstands are also expensive, with many models costing around PhP10,000 on their own.
DIY bike mechanics need not fret, however. Most of the jobs on a bike require a stable way of lifting the rear wheel clear off the ground, from my experience. I came across Minoura’s DS-30AL display stand, which does exactly that.
The Minoura DS-30AL display stand in folded form. Note that the stand’s tubes are naturally bowed inward due to an innate leaf spring effect.
SPECIFICATIONS
Made in Japan
Made of lightweight aluminum alloy tubing and ABS plastic
Accommodates both 130 and 135mm hub widths
Accommodates most quick releases except Campagnolo and Fulcrum
Two locking height positions can accommodate 18″, 20″, 26″ and 29″/700C wheels
Simple operation
Folds flat when not in use
Weight: 420g
OPERATION
The DS-30AL is basically a pair of roughly U-shaped aluminum alloy tubes joined by two tough ABS plastic pivots. One pivot has a round cup, while the other pivot has a slotted cup. The round cup fits over the adjustment nut for the quick-release skewer like a sleeve, while the slotted cup accepts the other end with the quick-release lever.
The slotted cup. This end pivot is meant to cradle the quick-release lever.The round cup. This pivot end is meant to go over the adjustment nut on a quick-release skewer.
The round cup end pivot has two notches. The notch closer to the default folded or “center” setting is the height for 26″ and 29″ mountain bikes and 700C road bikes. The other is the height for 18″ and 20″ bikes – a common size for folding bikes and mini velos.
These are the two notches for setting the height. The one closer to the center is the taller setting for a full-sized bike with wheels of 26″, 29″ and 700C size. It would likely work with a 650B MTB wheel too. The notch farther from the center is for small-wheeled 18″ or 20″ bikes.The taller height for 26″, 650B, 29″ and 700C wheels.The shorter, squatter height for 18″ and 20″ mini velos and folding bikes.
With a bit of finagling (there is no owner’s manual or instruction booklet), I figured out that the best way of getting both cups onto the ends of the rear axle is to do it while the alloy tubes are hanging off behind the rear wheel. The U-shaped tubes have a “leaf spring” effect, which you will have to counteract while clamping them onto the ends of the rear axle.
Once the cups are in place, the same leaf spring effect keeps them secure. You then open up the U-shaped tubes along their pivots to either of the notches for the desired height setting, then turn the entire assembly downward so that the tubes now support and lift the bike’s rear wheel. You will want to position the rear quick-release lever in a vertical position for best results, as the slotted cup tends to pop out if the lever is oriented horizontally – and may hit the center of your rear brake rotor.
The DS-30AL in action, propping up my Dahon Vitesse T10.The DS-30AL provides about 5-6 cm of rear wheel lift on a 20″ folding bike.
Used with care, the result is a very useful yet inexpensive “workstand” equivalent that will help in a lot of DIY bicycle maintenance and adjustment jobs. I’ve used the DS-30AL for rear and front derailleur cable tension and indexing adjustment, cleaning and lubing a chain, checking the rear tire for debris and cuts, and disc and rim brake adjustment. It’s a good workstand equivalent for these jobs because it raises the rear wheel of my 9kg TCX SLR 2 a good couple of centimeters, and my 13kg Vitesse T10 even higher – perfect for spinning the cranks and performing test shifts. Once done, just fold it flat and hide it away in a cranny or load it in your car.
The only improvements I can suggest to Minoura are to provide a set of hard rubber sleeves for the bottoms of the tubes. When used on a polished floor and while spinning the cranks on a lifted bike, the stand tends to slip a little. For heavier bikes, Minoura makes a heavy-duty steel version, the DS-80.
Used on my Giant TCX SLR 2, the DS-30AL provides 2 cm of stable rear-wheel lift.
Best of all, it won’t put a dent in your finances the same way a real workstand will. I got the DS-30AL for just under PhP700. At that price, you’re getting a dependable addition to your tool cabinet. With the help of YouTube videos, some practice, mechanical sympathy, and a small complement of tools, just about anybody can perform do-it-yourself maintenance, adjustments and repairs on a bicycle.
VERDICT
Highly recommended for the budding bike mechanic, and recommended for just about everyone else.
When you break your rear derailleur or your rear derailleur hanger while out on a ride, you effectively lose your ability to shift gears at the rear.
What do you do now?
Ex-pro rider Daniel Lloyd and the folks over at Global Cycling Network have a get-you-home solution: Turn your bicycle into a makeshift single-speed machine.


 Bike Hand’s torque wrench comes in a blow-molded black plastic box, made to house the wrench itself and all its bits. A metal double-hinge clasp keeps it shut.

 The selection of bits should guarantee that it will work with almost any bolt on your bike. On my Vitesse, 95% of its bolts can be worked on with a 5mm hex key. The larger size hex key bits are for use on kickstand mounting bolts (8mm) and freehub bodies (10mm). The 5mm long hex key bit is particularly useful for tightening the clamp band bolts on my TCX SLR 2‘s STI levers, which are slightly obscured by their brake hoods.